Illustrator Radial Design Creation Tutorial
graphicxtras > Adobe Illustrator tutorials > Illustrator how to tutorials
How to create interesting radial designs such as pie slices in Adobe Illustrator using polar grid (PG) tool tutorial as well as use the repeats etc to create radial designs, removing parts of the design, re-coloring the slices of the design, adding additional elements to the spokes of the radial shape and much more.
** Youtube video tutorial on how to create radial designs in Illustrator **1. Radial shape basic creation using grid tool
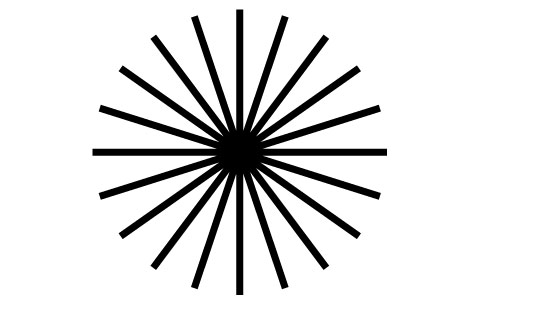
You can generate a pie slice or radial spokes by setting the concentric setting to zero in the PG tool (though weirdly it does still generate a single entry) and you can then set the radial to any number of spokes you wish to generate a pie slice or spokes (you can always remove the circle by un-grouping the path and then deleting it).
You can set the color of the slices, you can tweak the lines and much more to create all kinds of wonderful line art
You can always add some additional paths to the design such as perhaps some circles. Create a circle and fill and then hold down the alt / option key and drag to duplicate and place at the ends of the radial shape.

2. Expand the radial shape and pathfinder combos
Select all the radial spokes and then go to the object menu and expand. Once you have expanded the design, go to the pathfinder and then click the unite button
You can continue to modify the design such as perhaps adding additional circles to the unfilled part of the radial shape

Or perhaps adding the circles to the spokes and then using the unite option in the pathfinder with all the art selected

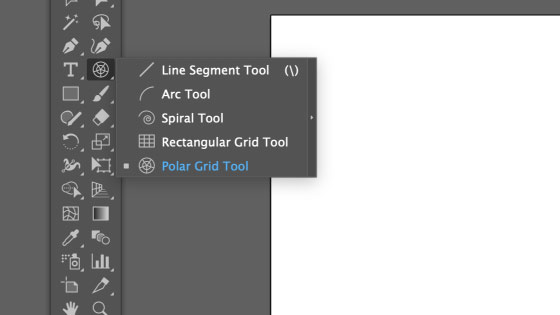
3. Radial pie slices Creation

Go to the PG tool. Double click the PG tool icon to display the options.
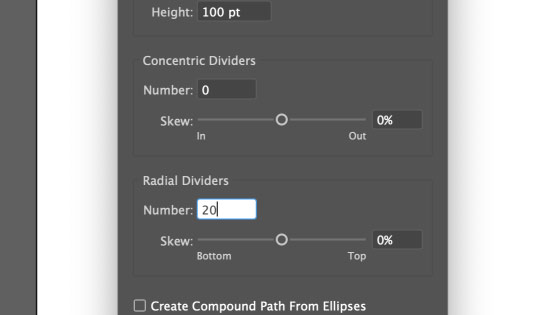
If you want to create just slices then set the concentric dividers to zero.
If you want 14 slices in the grid, enter 14 into the radial divider field. If you want a circle of 40 slices, enter 40 into the radial divider field. The limit is 999 which does result in a pretty narrow slice.
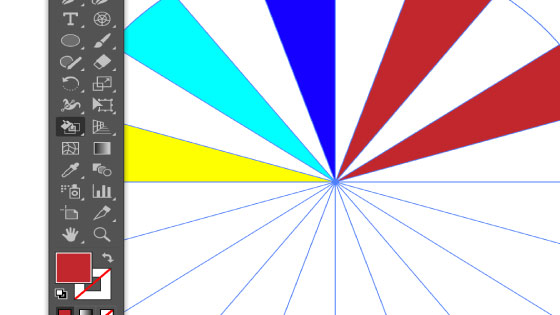
The slices can also then be manipulated further by using the ungroup command found in the object menu.
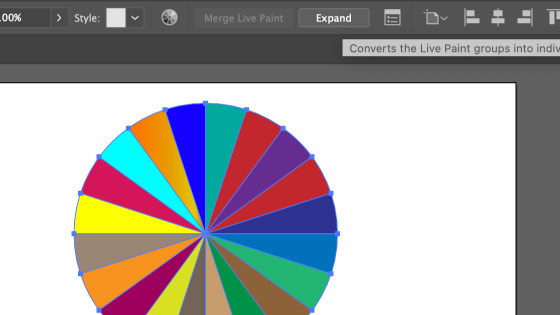
The result of the ungroup being a solid circle and a set of lines (not slices). To turn them into slices, use the live paint tool to fill all the slices with the same color or different colors and then move the slices to different positions. Once you have finished, click the expand button at the top of the screen
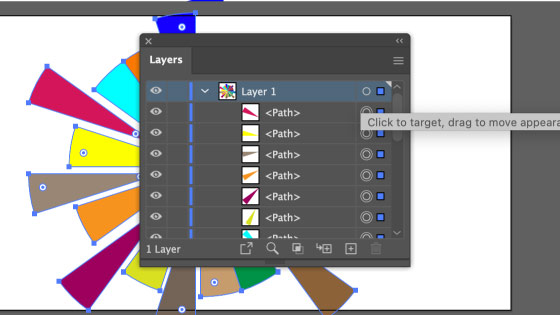
It does require a few additional un-groups to get at the slices or you could separate all the slices by using the isolation mode by double clicking the path.

You can keep all the shapes in the same location or you can drag to different positions in isolation mode. Another alternative approach would be to use the layers panel and select the individual layers there and move them that way.
4. Multiple overlapping radial designs

You don't need to just create a single PG path, multiple paths can be created using the tool.
The settings can be varied for each of the grids and then all the grids can be aligned to a single center and then un-grouped to create a more colorful radial design
Select the PG tool, press return to display the settings panel, set concentric to 0, set radial to 15 and apply

Go back to the tool settings and set the radial to 12, create a new grid on top of the existing one but smaller, select both and then align them.
Go to the live paint bucket, select colors from a swatches library, go to each cell and apply the live paint bucket using the right and left arrow keys to scroll through the available swatch colors, expand live paint at the end of the re-coloring (expand button is available along the top of the application)

The radial shapes can then be re-colored using the color guide or color adjustment tools in the edit menu

5. Radial contours using offsets

Select the PG tool
Press return or double click the PG icon in the tools box to display the settings, set the concentric to 0, set the radial to 15
Apply the tool in Adobe Illustrator art board.
Object menu and ungroup, delete outer circle, select all the radial strokes, set the width to 12px, object menu and expand, pathfinder panel, unite, object menu and path and offset set to 10, change color, repeat offset, change color for that offset and so on
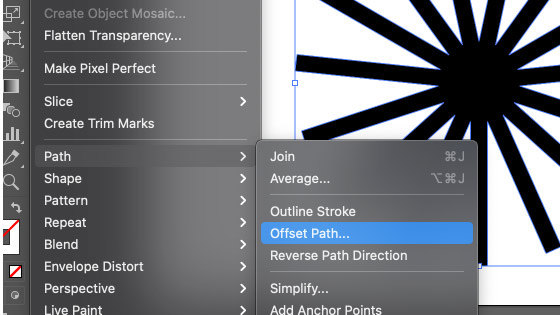

Continue on and add more offsets

You can create a dramatic vector shape by using the pathfinder panel and with the shape selected, click the exclude button (top right button)

A variation of this can be using the corners feature on the selected lines to create a rounded initial path. Select the basic spokes design and then goto the direct selection tool and you will see the corner widgets appear, drag one of the widgets to round the entire design

Go to the object menu and path and offset and then set the color and then repeat offset and color. You can also vary the width of the offset.

6. Repeat feature for creating radial shapes
You can use all kinds of designs as an input to the repeat feature (object menu and repeat and radial). The best designs are vertical for this

Go to the radial option and then set the radius of the object as well as the number of instances

It is a live object which can be modified in 1000s of ways. To access the designs at an individual level, double click one of the spokes and edit the artwork and that is then repeated all the way around the radial shape. Such as removing the circle and then replacing with duplicates of the triangle and changing the color