Illustrator Tilde Key ~ Hidden tricks tutorial
graphicxtras > Adobe Illustrator tutorials > Illustrator how to tutorials
** Youtube video tutorial on how to create wonderful path designs using the Illustrator tilde key and creating instant multiple paths **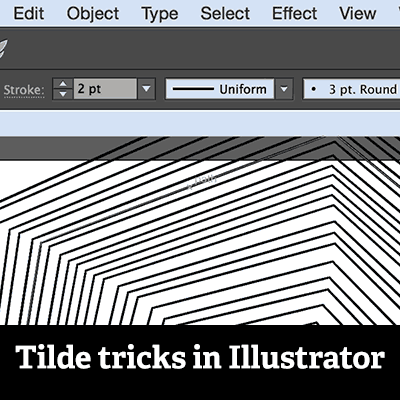
Tilde keyboard character (actually it perhaps should be the grave key ` tricks) and path tricks in Adobe Illustrator to create stars, lines, multiple circle path effects tutorial.
-
select line tool (or star, ellipse, rectangle) in Adobe Illustrator toolbar for use with the tilde / grave key
-
hold down the tilde (or actually the grave) key in keyboard
-
apply line to art board and generate 1000s of lines or ellipses as you move your cursor
-
release mouse to finish
The tilde character is found on the keyboard normally close to the shift / alt etc keys. The tilde key can be used with a number of different paths such as stars and lines. You can use the tilde key to create many paths in seconds and fill an art board with many indentical paths in different positions. The tilde key can generate the paths and they can be manipulated with tools such the layers panel in Adobe Illustrator. The tilde key paths in Adobe Illustrator are just normal paths and then can be combined in multiple ways. You can use the tilde key in Adobe Illustrator to create weird echo effects. You can use the tilde key to create amazing patterns and swatches. You can use the tilde key to create paths for the mirrorme plugin. The tilde key is also useful for swatches and can rotate the swatch interactively for the selected path. This tutorial shows you many different methods to create many paths by holding down the tilde key and how to manipulate the tilde generated paths in Adobe Illustrator
Tilde character or grave key - that is the main keyboard character for amazing repeat effects in Adobe Illustrator
Where is the tilde (grave) on the keyboard for use in Adobe Illustrator ?? This seems to depend on the keyboard so there is no simple answer to the issue. On my Mac keyboard I can find it where you would assume a shift would be required but no, it works. If you are using a Portuguese keyboard / Chinese keyboard / French keyboard etc then the location will probably be different. On my PC the tilde is found via the hash key or is it? Just using my tech keyboard and testing for the key I have found it sharing the same key as the ampersand and an angled line (but that is the same as on the mac so perhaps that is the tilde there as well). Anyway, once you have the character you can use it in many different ways with many different tools in Adobe Illustrator. Anyway, it really should be the grave character key perhaps ?? The tilde character shares the same keyboard character as the grave and to get to the tilde character it requires you to hold the shift key down - I have just gone along with the convention that it is the tilde character but personally, it really should be the grave key
What can you do with this tilde / grave character in Adobe Illustrator - use it with the rectangle and ellipse etc tools in Adobe Illustrator
-
Select the ellipse tool or star etc
-
Add a shape such as a circle or star or grid tool or spiral tool or rectangle tool etc and hold down the tilde key and you will see as you move back and forth across the art board a number of new paths / ellipse / stars being generated.
The ellipse tool generates ellipses / circles and the star tool generates stars. If you are using a path filled with swatches then you will see the the swatches rotate or scale depending on the rotate tool and scaling tool selected.
Reverse order command in the layer panel and the tilde (grave) character in Adobe Illustrator and change order of generated paths
One very useful tool with the tilde tool is the layer menu and reverse order, because the order of the paths may mean that the smaller shapes are behind the bigger shapes at the top of selection / layer order. The reverse order command found in the layer panel is great for reversing the order of the selected paths and putting the smaller path at the top of the order and making it visible again. One feature I would love to see would be a randomize the color of the selected paths but you can do that via a script (probably one available on the web)
How to use the Spacebar and tilde / grave keyboard character in Adobe Illustrator to reposition the generated item
You can also add into the mix the space bar. The space bar is useful as when you add a path in Adobe Illustrator you can move the generated item around and release the spacebar to set the place of origin for the generated path. You can use this with the generation of the multiple lines / circles etc as instead of adding all the lines and circles from a single point of origin, the circles and squares etc are all generated over the entire image and can fill an entire art board or two with those lines or spirals or circles etc. The key thing here is when you want to finish generating the paths, release the mouse first or you will loose the lines / spirals etc and you will then have to repeat the exercise.
What tools generate lines with the tilde / grave keyboard character in Adobe Illustrator (ellipse, star tool etc)
The rectangle tool, rounded rectangle, ellipse, polygon, star tool, but not the flare tool. The tilde also works with line segment tool, arc tool, spiral tool, rectangular grid, polar grid. Sadly, the tilde keyboard trick feature does not work with any of the other tools such as the brushes or the selection tool etc. You can create all kinds of multiple generated paths if you hold down the tilde and you can generate them in different directions (if you don't use the spacebar as well) but all from a single origin point. You can, once you finish generating them, add them all into a single group or perhaps add them as a symbol to the symbol panel. You can also change the color of the generated lines / spirals etc as well as add a width profile as well as brush strokes etc to the items.
-
Select the line segment tool
-
Set the line width etc
-
Select the tilde character and position start point for the line
-
Draw in a circle and you should generate numerous lines
-
Set the width as required and set the width profile to the first profile
-
Expand appearance via the object menu
-
Select all of the generated lines
-
Use pathfinder and combine / unite
Each of the tools also have their own settings so you can create stars with 5 points or 10 points etc with the key selected and you can also scale and rotate the star so you can generate a lovely line contoured artwork. The tilde generated paths work probably best with no fill though if you use the spacebar and move to different origin points then fills will also work ok (the reason being the fills will overlap on top of the existing items to you can't often see the underlying paths though you can get around that by changing the opacity of the paths as well as the blending mode of the created items.
What can I do with the generated lines / paths / spirals / grids etc created by the tilde / grave keyboard character in Adobe Illustrator
Well as mentioned, you can turn them into a group and then you can just move them around and perhaps scale and rotate them or warp them, you can also rotate them perhaps by 45 degrees and then add a new group and creating interesting combinations of groups or perhaps put them on layers. You can also export the generated artwork to Photoshop etc. You can add effects to the work, you can add blurs and much more to turn them into all kinds of weird and wonderful backgrounds and objects. You can also rotate and distort and envelope warp the created lines into all kinds of amazing line work.
How to use the tilde (~) / grave (`) keyboard character with third party plugins such as Mirrorme
You can use the result of holding down the spiral / line segment tool and the tilde key and use that with the powerful plugins such as Mirrorme. You can add the Mirrorme / symmetry effect to a group of items generated or perhaps the entire document. You can change the symmetry settings to create all kinds of different line artworks / paths and as always all the results are still paths which can also be modified even further and can be added to the CC libraries etc as well as used throughout the app.
How to use the tilde / grave to create weird surreal echo effects in Adobe Illustrator
Use the ellipse tool and the tilde character held down and then move left and up and then right and down and so on and you will see a set of circular lines generated within the confines of your drawing. You can create all kinds of weird and wonderful surreal 3D like shapes using that set of tools. You don't have to generate too many circles but you can create more or less and more dense by hovering the mouse around the same rough area as well as rapidly moving in other areas to create more sparse paths. Once you have created the basic four leaf (if you draw in all four quadrants around the centre point) You can group that and then perhaps rotate it 45 degrees or perhaps scale it or change the stroke or perhaps add a width profile etc. You can then can apply the tilde key and the circle again and create a set at the same angle as before and perhaps in a different color as well as with different profiles etc and they can also be combined in a group and then rotated and so on to create all kinds of wonderful surreal echo / contour line effects. The same can be done with the polar grid tool especially if you change the grid settings to have only circles / rings generated. You can also do the same with the rectangle tool and also the rounded option. The spiral generates perhaps the most extreme and odd of results and a more hand drawn look.
How to use the tilde / grave with the Illustrator pattern editor
The tilde character and spacebar and paths such as the ellipse can be added outside the pattern editor but you can also use the object menu and pattern command and make and then add the lines in their thousands to the pattern and the results can then be saved as a new swatch via the copy command inside the pattern editor. Hold down the arc tool etc and then spacebar to shift the origin and then hold down the tilde character and draw and you will generated 100s of curved lines / strokes (as well as fills if they are set) and then they can be defined as a new swatch and this can be continued with different combinations of multiple lines perhaps in different colors and more. You can then use those swatches with other paths as fills and strokes as well as with text and also in the appearance panel in Adobe Illustrator
If you want to interactively change the rotation and scale etc of a fill / swatch
If you have a path and you want to change the rotation / angle of the swatch or the scale etc you can do this via the transform command found via the object menu but instead you can sort of do this interactively (I won't say it is interactive as the update happens once you release the mouse stroke). Go to the path and select the rotate tool and then hold down the grave (it is not really the tilde as that requires the shift key to be held down) and it will look as if the path is rotating but the swatch is rotated instead. You will see a little indicator saying the angle (you can hold the shift down to constrain the angles etc) and then release and then you will see the changed swatch. You can do the same with the other tools such as the scale.
You can use the tilde / grave to fill the entire art board with lines in Adobe Illustrator
Select the line segment tool and then hold the spacebar down and also the tilde key and generate the lines and fill the art board. Release. Create another line at a different angle and then hold the spacebar and tilde and then create another set of generated lines with the current color etc and then release. Repeat this over and over and you can then select all the lines (which could be spirals or stars etc). You can also use all the lines and fill in the gaps with color to create an interesting colorful scatched background using the live paint tool.