Illustrator Space Fill Plugin Tutorial
graphicxtras > Adobe Illustrator tutorials > Illustrator plugin tutorials
** Youtube video tutorial on how to use the space fill plugin from Astute Graphics in Adobe Illustrator to fill designs with all kinds of paths, an unique plugin effect **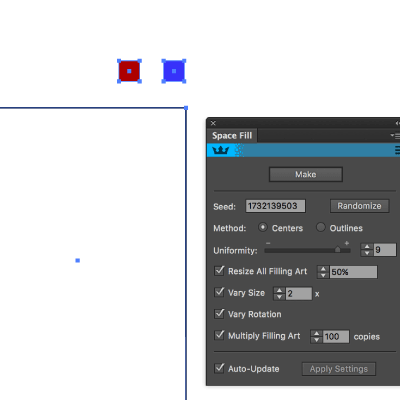
The space fill plugin is a plugin in Astute Graphics ColliderScribe plugin set for use in Adobe Illustrator.
The space fill plugin is a super powerful tool for filling paths with other paths. To use the space fill, simply select a large path (the fill) and select a smaller path or paths and then use the space fill panel.
-
1. Create a path such as rectangle (this is the path to be filled) as a container for the 'space fill' plugin in Adobe Illustrator
-
2. Create a path or multiple paths and these are the paths that are used to fill the first path
-
3. Select all of them
-
4. Go to the window menu and colliderscribe and select the space fill panel
-
5. Set the various settings (to be explained) and then click "make"
The plugin works with all kinds of paths such as type and also normal paths. The plugin can be filled with different colorful paths. You can fill the paths with type. You can fill the paths with all kinds of stroked open lines and curved paths to create amazing sketch artworks, grid designs, line artworks and more. The space fill is a live effect so the plugin can be edited and modified in many ways.
The tool includes many different settings as well as randomization features such as scale and rotation. This tutorial shows you many of the features of the powerful space fill plugin such as how to use it with multiple paths, how to use it with colorful paths, how to expand and release items, how to use the space fill with the color guide to create endless colorful designs. The key thing is that the main path is 'bigger' than the fillers.
The powerful space fill plugin is that fills paths with paths (it does work with symbols etc but it works best with paths and type). It is part of the ColliderScribe set from Astute Graphics and works in Adobe Illustrator
Method etc settings for the space fill plugin in Adobe Illustrator
The space fill has a limited set of features but as the sources for the paths and the fill paths can be unlimited then the results are equally unlimited as well even with a small selection of commands. Uniformity takes up quite a bit of the panel but the differences between the minimum and maximum are (personally) minimal in most examples I have created. You can see subtle changes if you change the - to the + as the paths seem to line up in an internal grid.
The centers and outlines methods are much the same, perhaps one showing a better result than the other though I generally keep it on centers. Outlines is definitely slower (and supposedly more accurate though I am not sure what that means with a random spread). The seed is useful if you wish to get consistent results such as enter 1 or 2 etc and then you can always enter that the next time.
I generally just click the randomize and wish there was auto randomize. Click randomize over and over and you can see a randomization of the position of the filling paths so the size / rotation / color (if they are in different colors) will change. It would be great if the plugin also re-colored the artwork with random colors. The other settings are more straight forward and you can see the changes to the space fill result - see below for the size etc settings
Color guide / adjust colors and effects combined with space fill
While you are using the space fill plugin, you can also use other tools such as the color guide to re-color the artwork for the space fill. You can do this afterwards or during the process of the space fill plugin. You can also use the adjust colors and others. You can also use other filters such as warps etc and continue to randomize the space fill. You can also randomize the space fill if you are using tools such as extrude filter in Adobe Illustrator though you cannot do it while the filter is active and the modal panel is displayed. Once you have applied the extrude, you can still randomize and change the space fill with the extruded filter applied so the 3D box will change as you click the randomize (note that it will be slow)
Release and expand - so you can use the designs as standard paths
If you change your mind during the creation of the space fill, you can always click the release and you can then access the original paths again and change them and re-start the make. You can also expand the result of the space fill and use them as normal paths and use tools such as pathfinder etc to create new paths using the results of the space fill.
Sizing and rotation of paths using the space fill plugin
One really nice feature of the space fill plugin is the re-size and rotation features (something that would be useful in 99% of the plugins and filters for Adobe Illustrator).
1. Resize all filling art (set the 'default' size for the fill paths)
2. Vary size (set to 2 to randomize the size of the fill paths between 100% and 200% of the 'default' size)
3. Vary rotation (randomize from 0 to 360 degrees) If you want to create a more grid like design, it is probably best to avoid that setting
4. Multiply filling art (basically the number of copies of the fill paths to be created)
Auto update - keep it on unless things are super slow.
The multiply filling art works for all art selected individually so if you select three artworks to use in the fill and the setting is 50 then 150 different pieces of artwork will be generated by the space fill
Use space fill with type / text to create amazing text designs
You can also use the space fill plugin in Adobe Illustrator with normal type.
-
Select some type and also a larger path
-
space fill panel to make
-
generate the type filled artwork.
Unfortunately you cannot select type and type together but you can expand the type (for the fill) and also then use the normal type with that (and still release it and change the type as required)
Use the plugin with grouping if you want to control the paths
You can use individual paths but you can also just select two or more and then use the grouping (in Adobe Illustrator) via the object menu and group and then the paths will be joined as an individual path and will be re-sized and rotated together. So if you want to apply a path with a shadow path below then you can group them and the space fill Illustrator plugin will spread that set of paths throughout the selected artwork. You can also create multiple groups and use those with the space fill plugin in Adobe Illustrator