Illustrator symbol Stipplism plugin Tutorial
graphicxtras > Adobe Illustrator tutorials > Illustrator plugin tutorials
** Youtube video tutorial on how to use the symbol stipplism plugin from Astute Graphics in Illustrator to create the most amazing visual effects in seconds **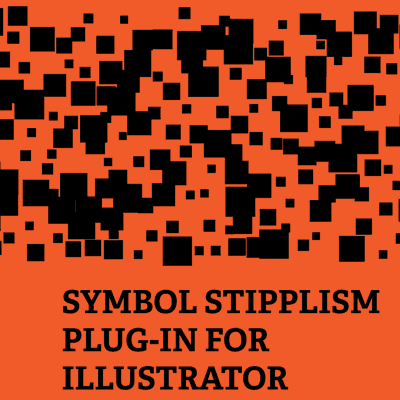
How to use the Astute Graphic's Symbol Stipplism plugin for Adobe Illustrator with symbols and paths tutorial.
The symbol stipplism plugin tool is from Astute Graphics and is for Adobe Illustrator and is the second part of the Stipplism set and is great for manipulating symbols and paths in 1000s of ways.
-
Illustrator Effects menu (for the stipplism plugin from Astute Graphics)
-
Select a normal path for the symbol stipplism to work with
-
stipplism
-
symbol stipple
-
set symbol from the symbols list
-
set density
-
set overall scale
-
set preview on
-
OK
The symbol stipplism plugin uses symbols as source material. Symbols can be made of all kinds of paths and designs. Symbols can be type, brush strokes, images, compound paths, multiple paths, distorted paths, colorful paths and more. The symbol stipplism plugin for Adobe Illustrator can be used to create scratchy line designs. The symbol stipplism can be used to create halftone dot designs. The symbol stipplism plugin turns images into amazing vector paths in seconds (far superior to image trace in Adobe Illustrator). The symbol stipplism plugin can be used to create super colorful artworks.
You can use the symbol stipplism plugin with any symbol included in Adobe Illustrator as well as symbols on this site and any of your artworks as symbols. The symbol stipplism plugin is a live plugin tool so the results be changed and manipulated in many ways. You can obtain a free trial sampler version of the symbol stipplism plugin from the Astute graphics website. The results of the plugin can also be saved to the CC libraries and used in Photoshop.
You can control the density, the rotation, the scale etc of the symbols. This article shows you a number of ways how to use the powerful symbol stipplism tool to turn images into amazing unique artworks and how to turn a lifeless path into some unique and standout in seconds.
Plugin dialog for the symbol stipplism plugin for Adobe Illustrator
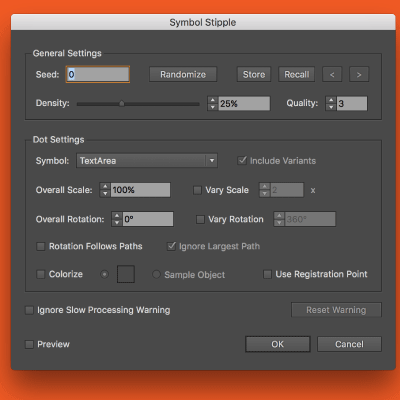
You can see the dialog when you select a path or paths and you go to the effects menu and the symbol tool of the stipplism. The dialog comes with a large number of options such as a seed (which randomizes the whole thing but usefully you can store the random seed and return it via the store and recall as well as skip through the various stored random seeds which is very useful).
Density of Illustrator symbols in symbol stipplism plugin
The density controls how many or how few of the objects that are generated within the space of the selected path. There is also a quality section which reduces or increases the quality of the generated result but I have not noticed much difference (it is subtle).
Actually the quality is probably my least used slider in the plugin. I am certain that many others will find the quality slider of a lot of use.
Dot settings for the symbol stipplism in Adobe Illustrator

You have a dot section (surely that should be symbol) but you can select the required preset from a list which sadly is not visual so you better name your shapes / presets in a sensible manner. There is a variants feature which is useful but that requires you to use a naming convention for the presets and that can be found on the Astute website as there are many interesting features you can add simply by naming them in different ways but it is a fairly obscure language setup.
You can change the overall scale of the selected preset though you could do that at the actual creation of the preset as well as setting the angle / rotation. The image on the right has the vary scale set to 2 so you have small and big symbols (they are the same symbols). You can also vary the scale and rotation which is useful so you can make all the presets between twice the size and the actual size (not totally flexible
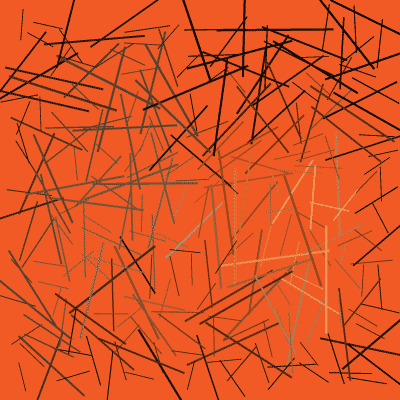
if you wish to have them range between 1/2 and 2 but I guess you can set the item up and then scale between 1 and 4 instead to get the same ratio). You can set the rotation to follow the path which is quite useful to create interesting frames etc. The image on the right shows the vary rotation and instead of using a dot symbol, a very basic stroke symbol was created
Color of symbols --- you can use the actual color of the symbol or add color to the symbol
You can colorize the presets as well based on the color of the selected object or to an actual color (though sadly not randomized). You can also preview the result which is quite useful.
That is the basic setup of the tool but you can use the tool in 1000s of ways with different paths and presets to create a near infinite range of artworks.
There is an option to use the registration point and that appears at first to have no use but you can change the result of the plugin by editing the symbol's registration point (you can see that when you edit a symbol and move the object away from the center of the initial position). Changing the registration radically re-positions the artwork if the artwork is still live.
Presets panel for the symbol stipplism plugin
You could use the default setup of the panel but if you want to create some interesting artwork then perhaps you might like to check out the symbols available on this site via our search. You can add really basic shapes to the panel such as a line or perhaps an image or perhaps use multiple colorful lines or perhaps circles or triangles and even with very basic shapes you can create all kinds of interesting artwork but you can also add very complex artwork to the presets panel as well and then use that with the plugin tool.
The key thing is to setup the panel in the best way for the best results for the tool and that is a clean (without the default items) and well named set as the dropdown of the presets does not display the image of the preset so you have only the name to go by.
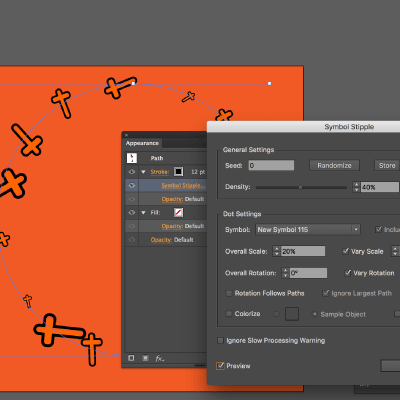
Use the symbol stipplism with multiple different symbols to create intense designs

To use, you can select multiple objects and then use the symbol stipplism plugin. To work, you must have at least one symbol to be able to select from the symbols list. Set the preview to be on otherwise you will see nothing but if you have a complex imagery then perhaps it is best to leave the preview off. The symbols on the right are from the cross symbols set for Adobe Illustrator available on the graphicxtras site.
Once you have finished, click OK and then to use the item as a set of actual paths that can be used in AI, use the object menu and expand appearance and then expand command. You can also use the artworks as live effects and you can modify the result via the appearance panel. If you select the artwork, go to the appearance panel and you will see the symbol stipplism line.
You can edit the effect by clicking on that line. You can also add additional fills and strokes to the artwork but do this, move the stipplism line to the fill or move it to the stroke section on the appearance panel.
Strokes can also be used as an excellent source for the symbol stipplism plugin
You can use the symbol stipplism plugin with the fill and fill a path with lots of symbols (or one) or you can select a stroke or the stroke of a path and then use the tool with that instead of the fill. You can add the effect multiple times to multiple strokes attached to a path. You can also combine the effect with width profiles as well for the stroke as well as using the dash options so you can get a pile of presets in one section and then a gap and then some more presets and so on.
You can see the image on the right using the stroke instead of the fill of an image with the symbol stipplism plugin, use the appearance to easily select the stroke and add the live effect to that
Images as a great source for symbols for use in the symbol stipplism plugin
You can select an image and use the plugin with that so you can turn any image into a vector made up of lines or dots or triangles or rings or etc any kind of item that can be stored as a symbol preset. You can add all the other options such as varying the size of the preset as well as rotation as well as changing the density and the higher and better the quality, the better the image will look.
You can then again expand the result and appearance. If you wish to combine the image and the effect then the only way would be to duplicate the original artwork and add the effect to the duplicated result. You can then blend the image and the vector using blending modes.
Type and the symbol stipplism plugin
You can select Illustrator type (live type) and then use that with the presets and the symbol stipplism plugin tool. You can use all the same tools such as rotation and random rotation and density and scaling etc. You can also add into the mix all the other effects as well via the appearance panel and other fills etc. You can also use type as a preset and then add the same type or different type to the currently selected text. All number of combinations of text and text can be generated and expanded though the more complex the text, the slower the render of the final result. You can have a whole page of text as a preset and then use that in the Stipplism plugin.
Final thoughts
The symbol stipplism is yet another wow tool from Atsute Graphics and the number of features and possible creative solutions are virtually unlimited. You can find more about the plugin set via the graphicxtras channel on Youtube.com as well as, of course, the Astute Graphics site