Illustrator Line Segment Tool Tutorial
graphicxtras > Adobe Illustrator tutorials > Illustrator tools tutorials
How to use the live line segment tool in Adobe Illustrator tutorial. The Illustrator live line segment tool can be found in the Illustrator toolbar of CC, it now supersedes the earlier line segment tool. This tutorial shows you how to use the preferences for the live line segment tool, use with arrowheads, how to use with the tilde key, how to rotate, how to turn it into a regular line shape. How to use it with effects as well as with the repeat feature.
** Youtube video tutorial on the line segment tool in Illustrator to create all kinds of unique linear designs **1. What does the live line tool do ? And where is it ?
The Illustrator live line segment tool draws lines using the current stroke setting. You can find it in the Illustrator tools box. The key panel for this is the properties panel (window menu)

Select the line segment tool in the Illustrator toolbar, set the stroke weight, set color, click art board with tool, draw using the live line segment tool. You can vary the stroke etc at any point such as adding arrowheads such as circular arrowheads

The live line tool can be applied multiple times. It generates two points that can be modified in 1000s of ways using tools such as direct selection tool and curvature tool. It can be used to create dramatic artworks in seconds in Adobe Illustrator.
2. Properties panel and Line tool
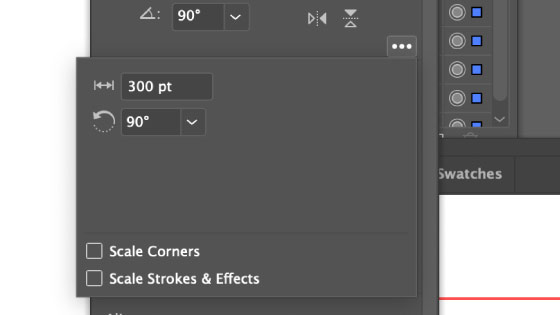
It is also live and can be edited via the Illustrator properties panel. You can change the angle, position, start point, fill, stroke, angle, opacity and more. Weirdly, you have to expand the properties (...) to access the length option which you would think is a more useful feature.
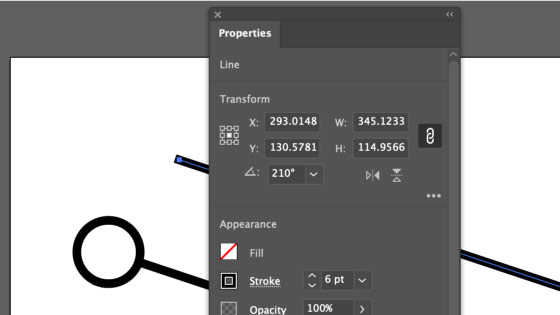
To access the length
3. Arrowheads and the Live Line Segment tool.
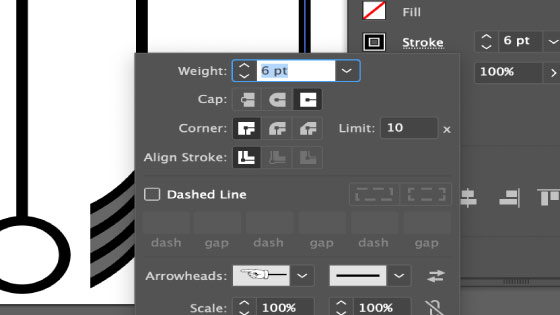
You can also add arrowheads via the stroke panel. You can add an arrowhead to the start and end of the line and there are a variety of different shapes. You can increase the size of the arrowhead via the scale feature in the strokes as well as by changing the width of the line. A selection below, they can be on both ends.
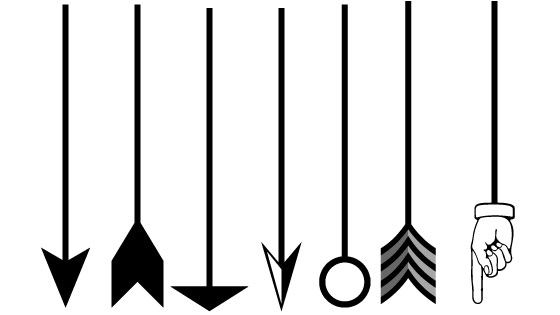
Set the arrow via the stroke section.
4. Expand line (not live any more)
You can at any time turn the stroke open line into a closed filled path via the object menu and expand.
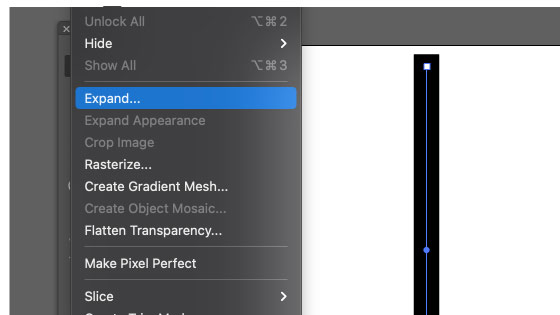
It will no longer be a live line though but it will have a fill and you can also now add a stroke to the design.

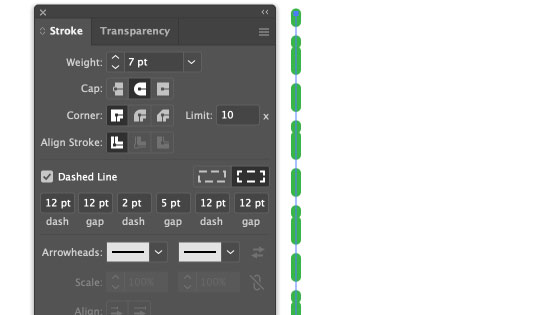
5. Dashed line and adding some dash to your lines
You can also modify the line to add dashes by clicking the dashed line option on the properties. The dashed line can be altered in a number of combinations such as different combos of dash and gap.
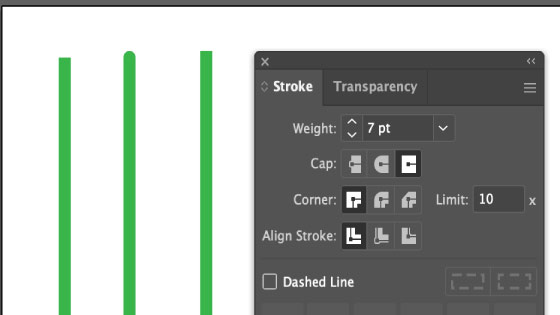
6. Caps and live line tool
You can also vary how the line ends (as well as how the dashes look) by changing the cap settings in the strokes as well as the alignment (inside, outside etc)
7. Width profiles and line tool
You can quickly draw a line and the line has a basic width, you can quickly add a profile via the stroke settings which is also live and can be changed at any point unless you go to the object menu and expand appearance.

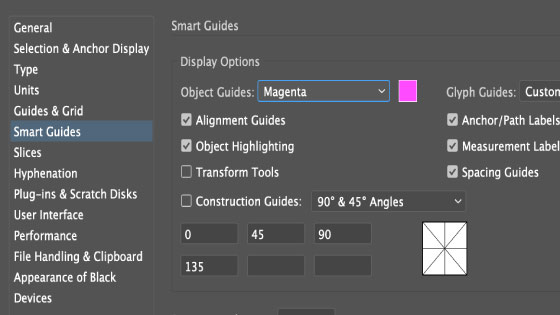
8. Preferences for the Illustrator 'live' line segment tool
I generally go to the preferences section and set up the preferences for the smart guide to include most of the features. Smart guides can be very useful as well as baffling at times in that sometimes where you expect a smart guide you won't see it and in some places you will. I am certain the smart guides will grow and be added to over and over in the next few versions of AI and they are generally worth checking out. Set the transformation tools to on and construction guides. You can use them without those set on as well.
9. End points and Live Line Tool
You can select the end points and rotate and as you move the artwork you will see smart guides popping up saying certain distances from certain paths and not others as well as various alignments. You may or may not like that feature but personally, I think the info is useful and it is great to be able to select a certain point to stop moving the path or changing the angle. The reference point does not seem to have any use.

To extend the length of the line just select either end point and stretch out to the required point or go the other way to shrink the line. You can also change the angle via the transformations panel as well as change the length and position of the path via the top bar.
Create a number of line segment paths using the live segment tool (vertical lines), select the top point of first line, hold the shift key, drag the end point up or down, repeat with the other line segment paths by selecting the top end point

You can also use the horizontal setting for the line (change the reference point to be the middle bottom)
10. Line rotation
The rotate can be done as before by using the selection tool and having the control just close to the end point (above). You can constrain the angle of the rotation to 45 degrees etc
Create a line segment path using the line segment tool, select the top end point, rotate, hold shift to constrain
Or use the transform panel to rotate the line

11. Tilde / grave key and the line segment tool in Adobe Illustrator for amazing weird designs
You can apply the line segment tool with the tilde tool, please check out our tilde trick tutorial on this as it can be used to create 1000s of paths such as zoom or circular artworks
Select the line segment tool in toolbar, select black for the color, set the stroke weight to 1, click art board, draw, hold tilde key down, release mouse

12. Live shape / line segment tool and adding brushes, widths etc
You can still change the stroke width, add width profiles (which is quite useful with the stretch and shrink end points) as well as brushes, effects, appearances, styles etc and the path is still a live shape.
Actually, unlike some of the other live tools, it does seem that there is no way to break the live aspect so all the effects are changed as the length is changed of the tool.
Select the line segment tool / live in Adobe Illustrator, create line, set the stroke weight, click stroke to display stroke panel, click dashed line, set dash to 5 and 10 etc. Or select the line and goto the brushes and select a brush stroke which can then be modified by double clicking the brushes setting

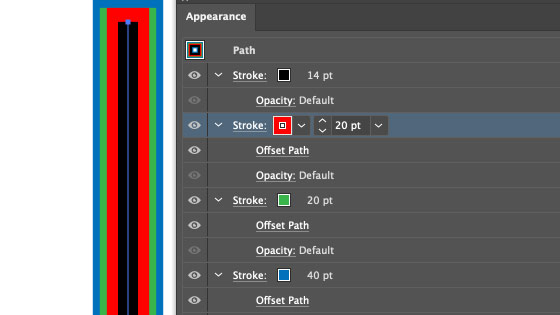
13, Appearance panel and adding multiple lines to the live lines
You can add to the live line via the appearance panel, you can go to the right side menu and add new fills as well as new strokes and also duplicate existing items and then change the settings such as stroke width as well as changing the color of the entry. You can also add into the mix for each entry an effect or two (effect menu) such as offset to offset the stroke (so you can see it)
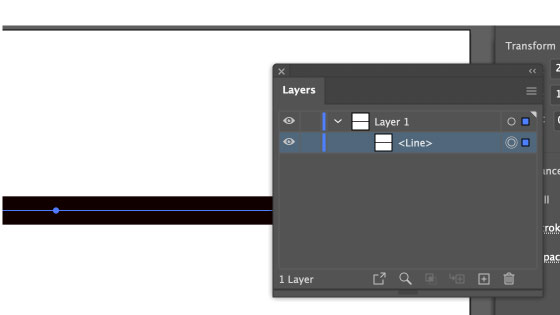
14. Layer panel and the Line tool
You will see the tool's generated path listed as a "line" and not a path in the layers
You can also use the fact that is a different shape and use the selection to select the same shape option to capture all the identical types though it would be nice if there was a select rectangles and select ellipses etc feature as well (sadly, not)
Create line using the live segment tool in Adobe Illustrator, go to the layers panel, expand layer entry, see line displayed in the listing (not path etc)
15. How to change from live shape to regular !
Use the Illustrator expand command but then it just becomes a fill. The solution is to go to the object menu and select the shape option and expand (you can also do the reverse with the convert command). You can, of course, just avoid the tool altogether and use the pen tool to create two points (always useful to have a number of features to create the same sort of thing)

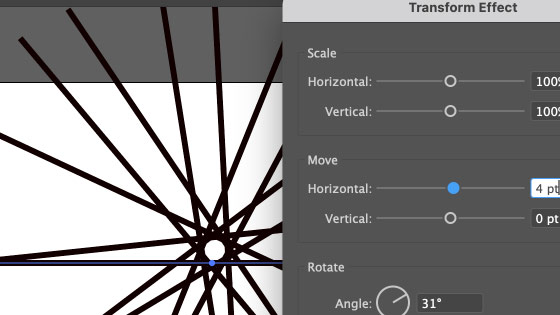
16. Live Line Tool and Effects
You can add effects to the live line tool so you can add a blur or transform etc and you can vary these via the appearance panel
17. Live Line Tool and repeat
You can use the live line tool with the repeat feature via the object menu and repeat and radial, simply select the line and then create all kinds of interactive artwork designs which can be edited at any point.