Photoshop Transparent Gradients Tutorial
graphicxtras > Adobe Photoshop tutorials > Photoshop gradients tutorials
** Youtube video tutorial on how to create transparent gradients and use the transparency in Photoshop to create amazing artwork on layers and more **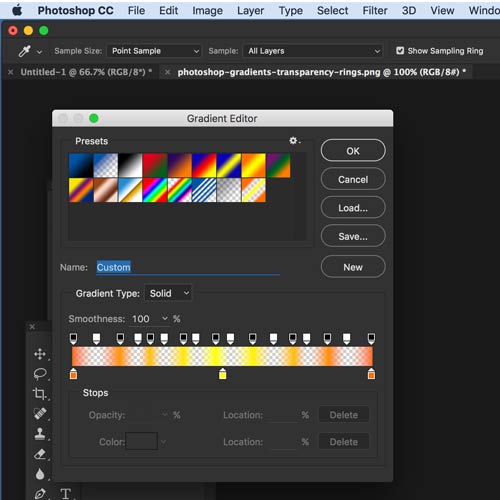
How to add transparency / opacity to Photoshop gradients and then use to create amazing grids and columns etc.
Change the transparency for the gradients by selecting the gradient tool and then the gradient dropdown / preset picker along the top bar.
Set the opacity stops along the top bar. You can set a two 0% opacity stops at the far ends of the gradient bar with a single 100% opacity stop.
You can also create columns by using alternate 0 and 100% opacity stops at 0% 10% 20% etc. You can also create grids by using the the same column gradient twice (perpendicular). You can also same opacity stop techniques to create frames and lines and many other designs. This tutorial shows a number of ways to use opacity stps and Photoshop gradients to create lines, columns, grids etc
-
Select gradient tool in Photoshop
-
Click the gradient dropdown / preset picker
-
Go to the gradient bar in the center of gradient editor
-
Go to the top of the bar
-
Click a gradient stop
-
Change the opacity setting to 0% etc
Photoshop gradients can include transparency, you can also add transparency to create amazing and interesting effects
Some of the Photoshop default gradients come with transparency / opacity but if you want to add some transparency / opacity to your own gradients or ones that you have purchased, how do you go about it. You can add the transparency via the opacity stops along the gradient bar in the gradient editor
-
Click top of the bar with opacity stop
-
Set opacity value to 0% or less than 100%
-
Add multiple opacity stops
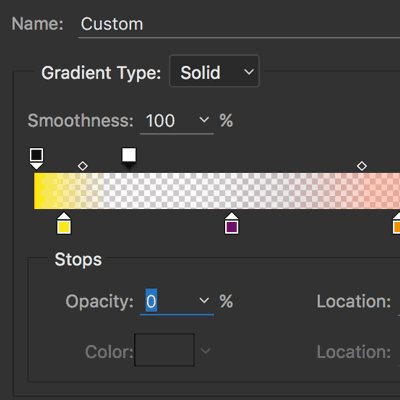
How to add transparency / opacity to the Photoshop gradients via the preset editor in Photoshop

Select the gradient tool in Adobe ® Photoshop ® and then click the preset panel on the top option bar (left). The preset editor is now visible. Go to the top of the preset bar (transparency stops) and click (stop is then added), select.
Go to the stops field at the bottom of the editor and set the stop to something less than 100% (for full transparency, set to 0.
Personally, I like to add transparency to both of the far ends - setting the opacity to 0 and leave the inner stops to 100% or less. Of course, you can set the stops to any value depending on the transparency you want to achieve.
You can also use the opacity midpoints to add more opacity or less opacity depending on the closeness to the individual stops. Just select the midpoint and move back and forth to change the color you see.
The number of midpoints is two if you have three opacity stops, so always one less than the number of stops.
-
Select the midpoint between the opacity stops (between two)
-
Move that towards or away from one of the opacity stops
-
The color spreads or fades depending on the direction
-
OK
-
Apply gradient
How to create a single straight colorful line in Photoshop using gradients and transparency and opacity stops

-
Select gradient tool and click gradient preset picker
-
Set the opacity stop for 20 at 0% and 50 at 100% and 80 at 0%
-
Set the color around the 50 in the middle of the gradient bar
-
OK
-
Set to linear
-
Apply gradient
The area shown in white is the area where there is 100% transparency so if it had been blue or black as a background, blue or black would have been displayed
How to create columns of colorful lines in Photoshop using the gradient stops via the presets editor

Go to the gradient editor and set the opacity at the 0 position to 100% and then set the 25% position stop to 0% opacity and then 50% position to 100% opacity and 75% position at 0% opacity and the 100% position to 100% opacity. You can set the color stops to anything.
You can make every complex combinations of 0% and 100% opacity to create more or less columns.
-
Set background to blue
-
Gradient tool in Photoshop toolbar
-
Click gradient preset picker
-
Set a single color stop in the bottom of gradient bar (yellow)
-
Go to the opacity bar
-
Set stop at 0, 10, 20, 30, 40, 50,60, 70, 80, 90, 100
-
Set the stop at 0 to 0%, set the stop at 10 to 100%, set the stop at 20 to 0% etc so 0, 100, 0, 100, 0, 100 etc
-
Click OK
-
Set to linear
-
Apply gradient across image
How to create a grid in Photoshop using gradients by combining perpendicular gradients and blending modes

You can create the above columns and then add that to an image from left to right across an image in linear mode and then repeat with the same from top to bottom and you will have a basic grid from the presets or perhaps use the transparency and opacity and also use different blending modes such as exclusion to create interesting Photoshop grids using gradients
-
Gradient tool in Photoshop toolbar
-
Click gradient preset picker
-
Go to the opacity bar
-
Set stop at 0, 10, 20, 30, 40, 50,60, 70, 80, 90, 100
-
Set the stop at 0 to 0%, set the stop at 10 to 100%, set the stop at 20 to 0% etc so 0, 100, 0, 100, 0, 100 etc
-
Set the color stops at the 0, 10, 20 etc to different colors
-
Click OK
-
Set to linear
-
Apply gradient across image
-
Set blending mode to difference
-
Apply the gradient across image 90 degrees to the origin
How to create interesting frames in Photoshop by using gradients and transparency along the four edges of a document or selection

Set the opacity for the far left to 100% and click at 50% and then add a new opacity stop and set the opacity to 0% and then set the far right position stop to 100%. Apply using any colors from left to right with the linear mode and then from top to bottom to create a very quick frame.
Or simply combine the gradients using the transparency and then select the middle region and remove the gradient from the center of the artwork
Another option for the Photoshop gradients and the transparency is to use them in linear modes and add opacity to the ends of the gradient set to 0% and then just add to the four edges of the page and overlap each of the colorful designs to form a quick and easy frame.
Creating lines or rings in Photoshop
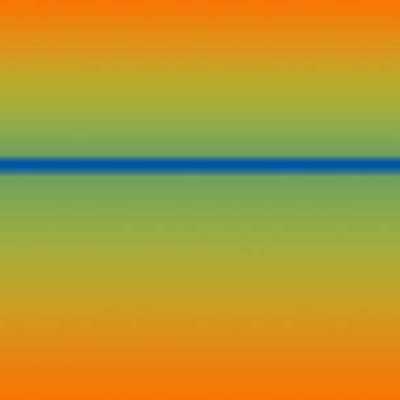
Set the opacity stop for the Photoshop gradient from 100% at the far left and set the opacity to 100% for the far right.
Set the 50% position opacity stop to 0% and then set the small midpoints to very close to the 50% position to create a super sharp line
You can also use the same approach with a gradient style of radial to create single ring designs.
How to remove transparency and opacity stops from a gradient in Photoshop
Just select the opacity stop and then delete key - though there has to be two opacity gradient stops in earlier versions of Photoshop and with the most recent versions, it now can be one opacity stop.