Photoshop Adobe Generator Tutorial / Image Assets
graphicxtras > Adobe Photoshop tutorials > Photoshop how to tutorials
How to use the powerful Adobe Generator for Photoshop to save assets in different sizes and formats automatically all by changing the name of the layer to include the format and dimensions of the file to be generated such as JPG, SVG etc. An automatic file for your current file - a great way to split your assets into individual files in a single folder.
** Youtube video tutorial on how to use the Adobe Generator feature to export assets in a variety of different formats and sizes based on layer names **
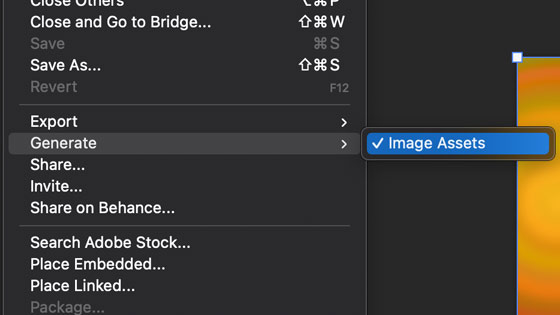
The Adobe Generator in Photoshop is a powerful export tool for files using layers and a naming convention for the export. 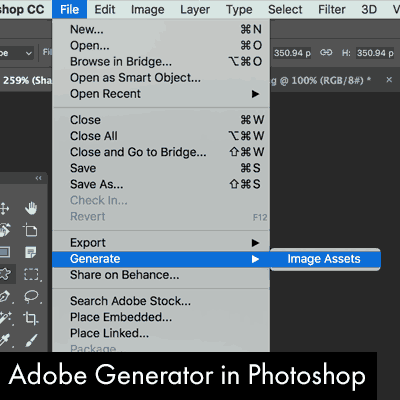 The Adobe generator is turned on via the file menu generate command. As simple as that. You can turn off the generator at any time as well.
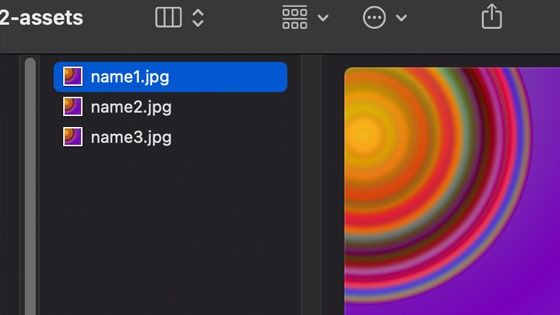
The Adobe generator then generates images instantly to the desktop or a sub folder of the file's folder. The language for the exports is set via the layer panel. You can export images in multiple sizes via the layer panel such as 100% or 50% or 400% etc. You can set it to be 1000% name1.jpg, 200% name2.jpg etc
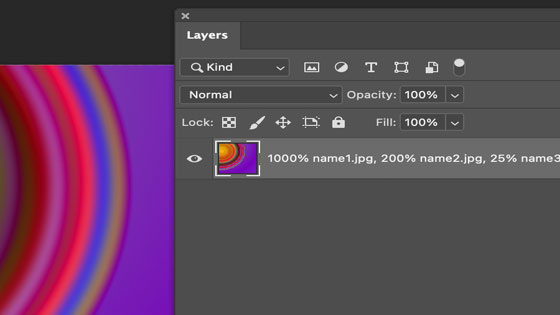
If you have created a layer name with 1000% name1.jpg etc then you will find a sub folder beneath your current document's location (if it is not saved then the assets appear on the desktop) given the name of the file (untitled etc) and the three files in the layers list are saved as jpg format or svg or png depending on what you set the format to
The Adobe generator for Adobe Photoshop can also set the name of the exported file as well as the format of the exported Photoshop layer file such as PNG or JPG or SVG etc. You can simply set an Adobe generator layer name as 400% layername.svg etc.
The export of resources is super easy to use and means work can be saved quickly and safely while you work in Photoshop.
To generate multiple files, separate the names of the files for the Adobe generators by commas.
This tutorial shows you the assets generated such as PNG and SVG. This tutorial also shows the commands to use and the basic language to use with the layer panel.
Adobe generator was introduced quite a few years ago now and it is still there in the file menu.
The tool needs to to be turned on via the file menu generate and image assets. Once turned on, all assets are generated either on the desktop or as a sub folder of the file folder.
-
File menu
-
Generate
-
Image assets
-
Create layers such as shape layers
-
Layers panel
-
Rename layer names to PNG etc files
Adobe Generator for Adobe Photoshop image assets / Assets generated - you can use generator to create PNG and JPGs etc

The Photoshop Adobe generator is a great feature for use for all kinds of assets as well as web design and resources (particular interest for me). The following file formats can be generated
-
PNG (PNG24, PNG, PNG8,PNG32)
-
JPG
-
GIF
All the assets generated can be modified by the Photoshop adobe generator language / script language. Of course, once you have the assets then you can modify them further.
Note that the Adobe generator is on a file by file basis so next time you use the Photoshop Adobe Generator, you need to turn it on again (which I think is quite fine as you might not need it for every task)
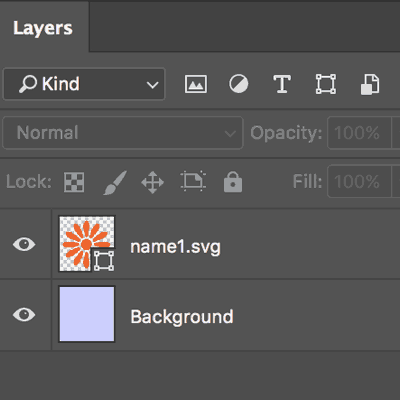
SVG Vector Format
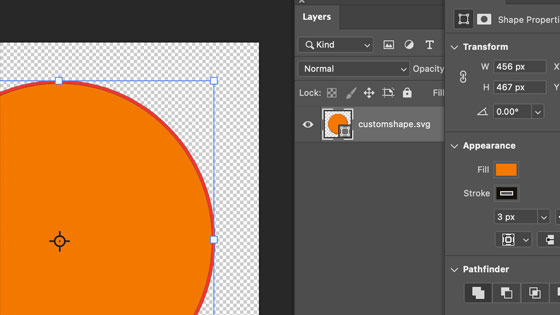
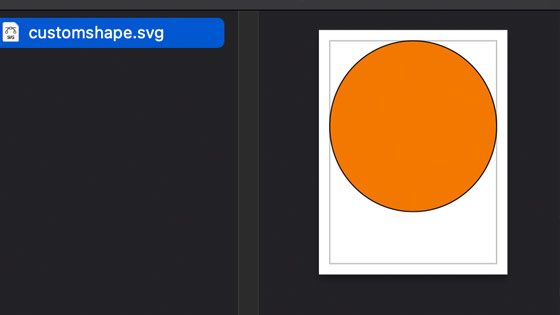
You can also export the design as a SVG vector (or raster). If you create a custom shape design using the shape option and go to the layers panel and give it a name such as 'custom-shape-1.svg' then you will find the asset will be saved as a vector SVG file format which is super useful for adding into web pages etc.
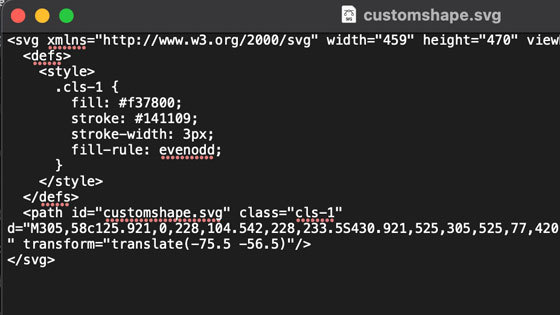
You can then go to the assets folder and find the file listed as SVG
You can edit the text file associated with the SVG. There is no point in putting any size setting as it is a vector.
Photoshop layers and Adobe generator - use the layers and the naming convention for the layers to generate the images
The key thing with the tool is to set the names via the layer. Instead of using layer 0, layer 1 etc you can change the layer name for the assets (for the Photoshop generator) to something like xxxx.PNG. The asset is then automatically saved as that file name in the location mentioned. The assets for the Photoshop layers / Photoshop Adobe Generator being
-
Text layers
-
Custom shapes layers
-
Pattern layers
-
Gradient layers
-
Brushes on layers
-
Text on layers / paths etc
-
and much more
As the Photoshop Adobe Generator doesn't care about the position etc of the asset, the layer comps is of no use with the P.A.G.
Export of assets using Generator from the layers in the current document
Once you have named all the layers as xxxx.png etc (the filename has to be unique) then all those layer assets are generated automatically.
You can then use them in Edge, Dreamweaver etc as required.
Photoshop Adobe generator language - there is a complex language of scale, format etc
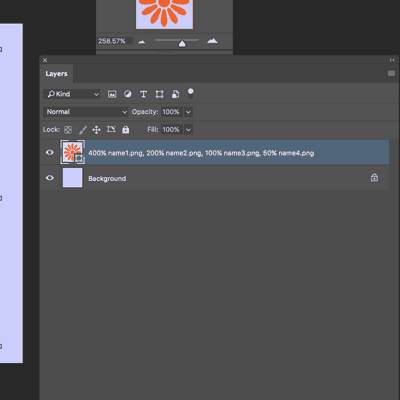
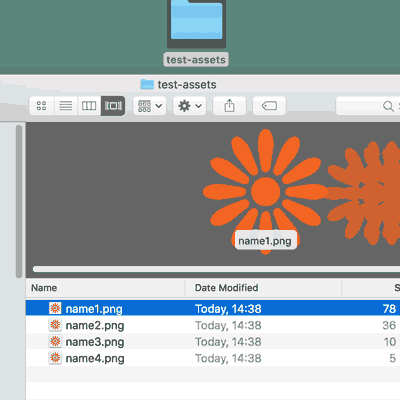
You can go even further than this and use even more complex terms in the layer name so instead of calling the layers Photoshop generator 1.png etc you can also add a percentage size in front of the text layer name and shape layer name etc. So if you want to save a range of files with the different file sizes then you can type
-
400% name1.png,
-
200% name2.png,
-
100% name3.png,
-
50% name4.png
You can also set the file to be a name1.svg just to generate a standard vector svg file from a custom shape etc
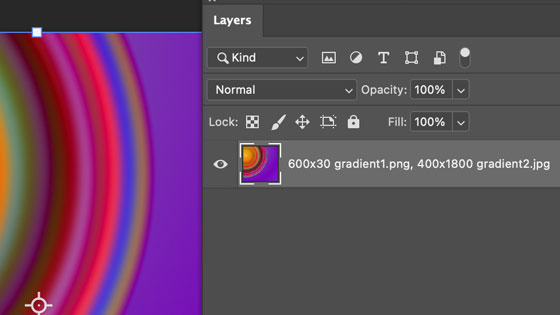
and so on and the P.A.G will save those files all the same layer but with different sizes and all PNG etc. You can set it to 2000% etc if you wish or whatever. You can also set the Photoshop Adobe Generator to a custom size so the layer can be saved as a 100x100 name1.png, 200x200 name2.png etc or even 100 x 400 name3.png and so on.
4000 x 300 layer1.png,
300 x 1200 layer1.jpg,
1200 x 5000 layer1-thin.jpg
etc
And that generates the following assets

Text assets and Adobe Generator
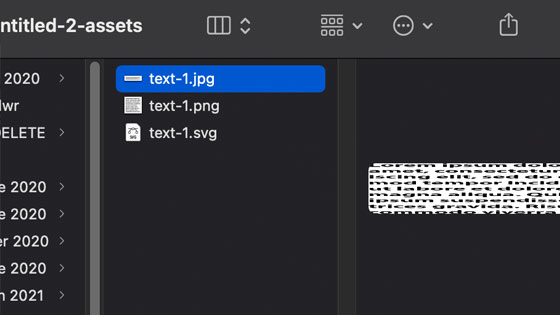
So if you have a text layer asset (perhaps a whole page of text) this can be saved as a document with a layer name of text1.png at 1000% the original size (relative to the document). Create a layer name such as 300% text-1.png, text-1.svg, 1000 x 200 text-1.jpg
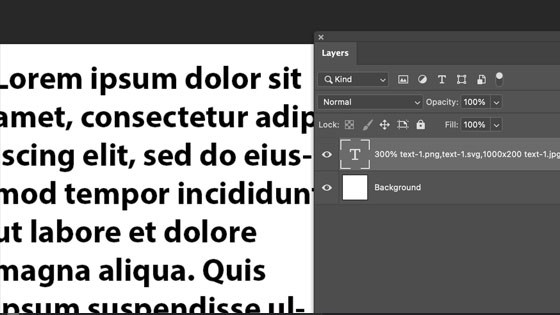
It will generate the files such as a text svg file (it just puts the text and doesn't convert to vector shapes) and for the 1000 x 200 it will squeeze the text by 500%. You can, of course, put more than that in the layer line though I suspect there must be some limit
Patterns
Likewise, a pattern layer (fill pattern layer) can be saved as a pattern 5000 x 5000 in size as well as other sizes.
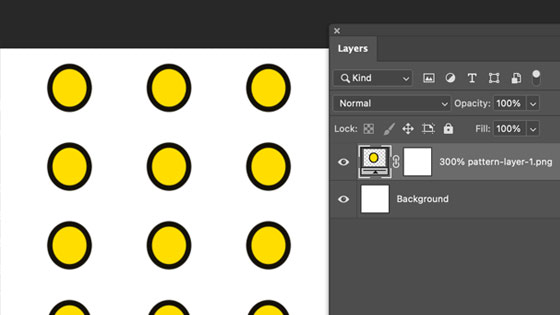
Photoshop Adobe generator will take some time to process this so you should not expect the assets to appear instantly if you are creating large files (and I am certain here are limits on the size). Custom shapes can also be saved as raster format PNG or GIF or JPGs
Live file change
It should be noted that if you change the name of the layer, the previous versions will disappear from the assets folder. If you want to save them, simply copy them from that folder before you change anything.
Stopping it
If you no longer want the assets to be generated, simply go to the generate and turn it off and that is that.
Photoshop Adobe Generator in creative cloud
Photoshop Adobe generator is great addition to Photoshop and hopefully one that can be extended to include a lot more features and expressions as well as file formats such as AI ?