Photoshop shapes multiple strokes Tutorial
graphicxtras > Adobe Photoshop tutorials > Photoshop shapes tutorials
** Youtube video tutorial on how to add multiple strokes to shapes in Photoshop **Learn how to add multiple strokes to Photoshop custom shapes to give an edge to your designs. You can add multiple strokes to Photoshop shape layers. You can strokes in a number of ways to Photoshop shapes on the PC and MAC.
You can add multiple strokes via the new layer styles panel. You can add multiple strokes by using the Photoshop shapes as smart objects and adding strokes to a smart object and then create that as a new smart object. You can add multiple colorful strokes to Photoshop type shapes.
You can add multiple strokes to a shape by combining it with Illustrator. The key thing for adding strokes is to use the artwork as a layer. The strokes can be set to different colors and the strokes can be different widths. This tutorial shows you how to add the multiple strokes to any Photoshop shape and type layers.
-
Select custom shapes tool in Photoshop toolbar
-
Create shape as shape layer option
-
Go to the layer menu
-
Layer style
-
Stroke
-
Set color and size etc for stroke
-
Click '+' to add another stroke to shape
-
Set color and size etc for stroke
-
OK
Adding multiple strokes to Photoshop shapes
You can create a vector layer via the CSH tool in Photoshop. You can also add the multiple strokes / gradients to the artwork. The key thing is that it is a layer and the layer can have layer effects applied and key to that is the stroke feature.
Adding one stroke to the path

Select the layer and then go to the layer menu and select the layer effects menu and apply a stroke and you can set either to a solid color, pattern or gradient.
-
Select the custom shape
-
Layer menu in Photoshop
-
Layer style
-
Stroke
-
Set stroke size and color etc
-
OK
See below for the update to the latest version where multiple strokes can be added via the layer styles panel
How to add multiple strokes using the new features of the layer styles in Creative Cloud in
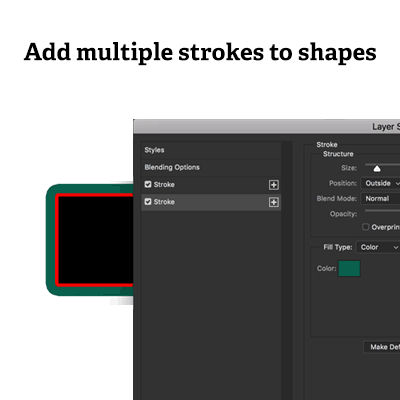
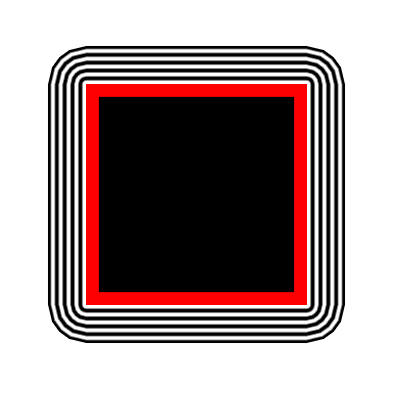
With the latest release of Photoshop, you can now add multiple strokes as well as gradients and glows etc. Still, this does require some setup. Say select a circle and then go to the layer menu and then layer styles. Depends on the order of the added style and also the position which can be outside or inside or center.
For simplicity, set the first stroke in red to outside at 16px. Click the '+' next to the field and this will create another and to see the result, simply set the value to a little more than the 16px otherwise you just won't see it. So set the second entry to 24px say and a different color such as black and you will now see two strokes - this can be repeated with the outside options so you can click '+' and then added another say with a value of 50px. Again, the result can end up fairly coarse in Photoshop.
The key thing for adding strokes is the order of the strokes, sometimes you will find you are just covering the previous strokes
-
Go to the stroke section in layer style panel
-
Click the '+'
-
Set the size and color etc
How to add multiple strokes by using the design as a smart object and adding multiple stroke styles in Photoshop

Now, go to the layer menu and smart objects and convert to smart object. You can now go back to the layer menu and layer effects and add an additional stroke to the Photoshop shape new object.
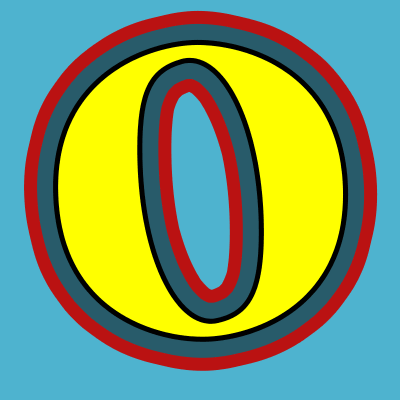
This process can now be repeated, simply by converting the path again and again into a smart object (though clearly there are limits as you will see Photoshop get slower and slower processing all these additional smart objects). The only problem with this is the coarseness of the applied vector once you add too many or too large a size.
The image on the right shows a vector circle and there is a slight coarseness already to the artwork - this is definitely multiplied if you have a more complex artwork. You can also add multiple strokes via the smart object method to type as well.
-
Create a shape using the shape tool
-
Set to shape layer option
-
Set fill color and stroke
-
Layer menu
-
Smart objects
-
Convert to smart object
-
Layer menu in Photoshop
-
Layer style
-
Stroke
-
Set size etc
-
OK
-
Layer menu
-
Smart objects
-
Convert to smart object
-
Layer menu
-
Layer style
-
Stroke etc
Alternative solution - scaling shapes with strokes

For some objects, there is an easier option - simply duplicate the original path and then re-size and re-size (reducing the size and changing the layer style for each of the layers or perhaps the stroke added via the properties for the vector).
You can then just use the group option in the layer menu to group the stroked objects together. Perhaps not such as elegant solution and definitely does not work well for all paths.
How to use Illustrator to add multiple strokes and then copy back to Photoshop
in Adobe Illustrator, by default, you can only add one stroke but you can select a shape and go to the appearance panel and then select the right side menu and add new stroke. You can repeat this multiple times but the same issue is hit where you have to get the width and the right order otherwise they will be hidden.
You can then copy the artwork back into the CC library and use the same artwork in Photoshop (not that they won't be a CSH vector though but it can be used as a layer)
Fonts / type and adding multiple strokes in Photoshop

It should be noted that you can also do much the same with fonts such as adding multiple strokes via the layer styles panel
-
Type tool in Photoshop toolbar
-
Create some type
-
Layer menu
-
Layer style
-
Stroke
-
Set color of stroke and size etc
-
Click '+' next to stroke
-
Set color of stroke and size etc
-
OK
You can add multiple strokes to the type
How to use the Photoshop shapeburst as multiple fake 'strokes'
To add strokes to shape can be faked by using the layer menu and layer styles. Set a large size and position and fill type to gradient and the style to "shapeburst". You can create gradients with multiple color stops such as white stop, black stop, white stop, black stop, white stop etc
-
Select shape
-
Layer menu
-
Stroke
-
Set size large
-
Position outside
-
Fill type set to gradient
-
Click gradient dropdown
-
Create a new gradient using white stop, black stop, etc multiple times
-
OK to accept gradient
-
Set to shapeburst
-
OK