Affinity Photo Bilateral Blur filter Tutorial
graphicxtras > Affinity Photo tutorials > Affinity Photo Filters tutorials
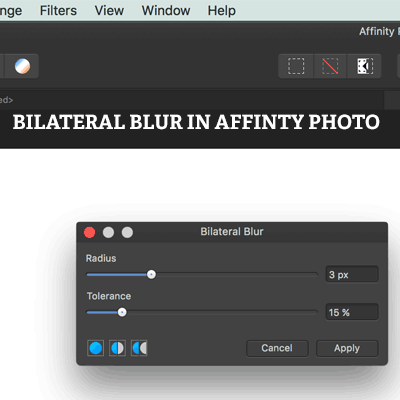
The bilateral blur in Affinity Photo is a blurring plugin that can be found in the blur category of the filter menu. The bilateral blur can be used with images and layers and type. The bilateral blur filter comes with two settings radius and tolerance. The bilateral blur is great for edge preserving of an image as well as noise reducing. The higher the radius setting and tolerance, the more you will see the horizontal and vertical blurring in the image. The bilateral blur can be used once or multiple times to create all kinds of magical blurring effects in Affinity Photo. It is destructive so it works best if you use the bilarteral blur on a layer and then use blending modes and opacity to combine with the original.
Live filter layer
You can also use the live filter layer bilateral blur and that means you have also instant access to the blending mode and opacity as well as the bilateral blur filter effect. The live filter layer version can be used with a layer or applied to all layers. You can also use the bilateral blur live layer once or multiple times. You can also create stunning type effects with the bilateral blur by applying to text layers in Affinity Photo. You can create super interesting effects by using the bilateral blur filter with other filters in Affinity Photo. This tutorial shows how to use the bilateral blur filter as filter and live layer filter as well as combining with others and use with type
-
Filter menu in Affinity Photo
-
Blur
-
Bilateral blur
-
Set radius
-
Set tolerance
-
Click apply
Bilateral blur in Affinity Photo for edge preserving and noise reduction
The bilateral blur filter for use in Affinity Photo can be found in the blur category of the filter menu in Affinity Photo, it is a powerful blurring destructive filter effect that can be used to modify all kinds of images as well as resources and presets available for use in the application
The Affinity Photo filter comes with two options but they are very powerful features
-
radius
-
tolerance
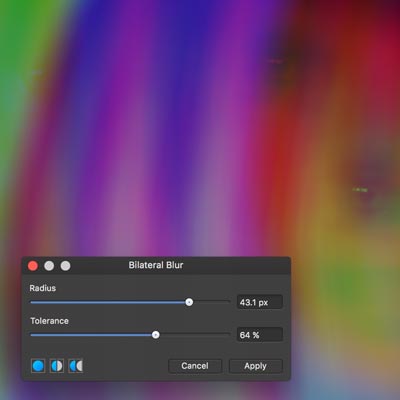
The bilateral blur is for edge preserving and noise reducing. Push up the tolerance and radius to the max and you will see horizontal and vertical blurring and very little image (but also very little noise).
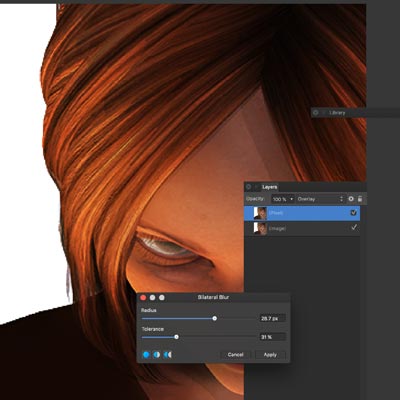
Now if you use it with a little more restraint such as reducing the tolerance down (at zero you will see no blurring) to about 30% and radius at the max you will see a lot of blurring but any text will still be generally visible as well as any edges. Even with a low radius, you can see the vertical and horizontal blurring. By setting the radius high and tolerance low you can create a sort of blurry mist with the flat parts (such as walls) of an image with the edges still fairly clear.
As with any Affinity Photo filter, you can always use the bilateral blur filter more than once and combine that effect with multiple applications such as using low settings five or six times over.
Bilateral blur and using the filter effect instead on layers in Affinity Photo

Another option for the destructive bilateral effect is to use the filter on a duplicate of the original image layer and then blur that and then you can either remove the bilateral blur or you can also use the effect with blending modes for the layer as well as change the opacity and so the effect can be seen in darken or lighten etc
-
Layer menu
-
duplicate
-
filters menu
-
blur
-
bilateral blur
-
set radius and tolerance
-
apply
-
layers panel
-
set the blending mode and opacity (such as contrast negate)
Live filter and the bilateral blur in Affinity Photo and edit the effects

You can also do much the same with the bilateral filter but via the live filter layer in the layer menu and you can then apply a non destructive effect as well as use blend modes as well as re-position the effect and how it is applied to the layers as well as the layers below.
-
select image layer in Affinity Photo
-
layer menu
-
new live filter layer
-
bilateral blur filter
-
set radius etc
Use the bilateral blur with type to create amazing blur effects
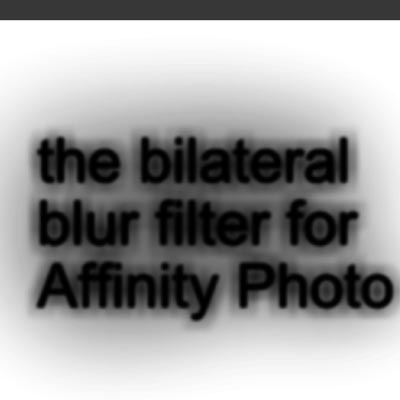
You can also use Affinity Photo type / text with the bilateral blur filter, simply add a large font design into the middle of your image and then add the bilateral blur filter and the type will remain only lightly touched for many settings though that can be changed by adding noise and color to the type and then the type can be changed in a more extreme way.
If you use the live filter layer for the effect and combine that with the type then the type will appear far more ghostly with the radius and tolerance set to the maximum or with a glow if the blend mode is set to screen.
The bilateral blur can be added multiple times to type / artistic text and can be used to create all kinds of unusual edge effects (as with the image of some text on the right)
-
Create some text in Affinity Photo
-
layer menu
-
merge down
-
filters
-
blur
-
bilateral blur
-
set radius etc
-
repeat filter
Combine the bilateral blur with other filters in Affinity Photo
The Affinity Photo's bilateral blur filter can also be used with other filters and can be used to create interesting smudge painter like backgrounds with the perlin noise filter and radius set to maximum and the tolerance set fairly low.
You can also use the blilateral blur filter across color channels to create some interesting blurring color effects
You can also use the result of the bilateral blur filter (with the settings set fairly high to create horizontal and vertical blurring) and then use that with tools such as deform filter to create some truly weird and distorted blur effects especially combined with the image on a layer and blending modes used to display the original layer and the blurred layer.
The bilateral blur filter is a very interesting filter for all kinds of visual experimentation but as with all filters, the source material does alter the final outcome