Affinity Photo High Pass filter / Edge Sharp Tutorial
graphicxtras > Affinity Photo tutorials > Affinity Photo Filters tutorials
** Youtube video tutorial on the high pass edge sharpening filter in Affinity Photo **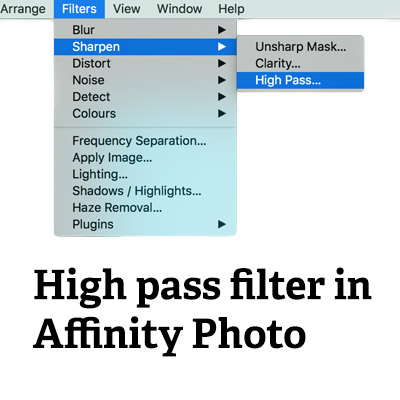
The high pass filter in Affinity Photo is for sharpening edges of images (as well as creating interesting glows etc)
The high pass filter for Affinity Photo can be found in the sharpen menu (beneath the Affinity Photo filter menu).
The high pass filter is a powerful tool for creating all kinds of sharpening the edge of images and embossed edge-like effects and much more. You can also use the high pass with images as well as other resources such as fonts and brush strokes and patterns and more. The high pass filter is a tool to generate an image or layer than can be then combined with the original image to hopefully improve or at least, fit the requirement for your artistic vision for the image or text or shape etc.
The high pass has a few options (two) includes radius and monochrome. The easiest way to use it is create a duplicate layer of the original image and use blending modes. There is also a high pass filter live layer and that comes with the same options and blending modes and opacity. The high pass filter is great for ghostly effects. It should be noted that the high pass filter is in the Photo persona
-
Filters menu in Affinity Photo
-
Sharpen
-
High pass
-
Set radius etc
-
Apply
Options in the high pass filter

There are not many options available, just two and that is the radius of the effect and the monochome option (which is a bit of an odd one as you can always change the color to a black and white etc / monochrome etc by using the high pass filter with an adjustment layer. The radius at 0 shows hardly anything beyond a very gray image but as you increase the radius setting to change the edge sharpening, you will see more and more of the original image and more of a glow around the image though you will never remove the grayness. At the very highest setting, the high pass gives a slightly surreal gray glow to the image and very little of the fine edge sharpening effect.
You can also use the mouse to modify the setting of the radius by dragging across the image (though it is not so effective in this filter).
Blurred images with the high pass filter in Affinity Photo
Trying the high pass filter with a fairly blurred image is a bit of a waste of time. It works best with images that are reasonably sharp to begin with, it will not work miracles and retrieve a smudged image.
Duplicate layers and blend when using filters such as the high pass filter in Affinity Photo
If I am using the filters, I generally go for a duplicate of the image before I start to use a filter such as the high pass filter in Affinity Photo as I can always then just delete the result if I am not happy with it but it gives me an option to blend the result with the original and that may have even better results than just the single application.
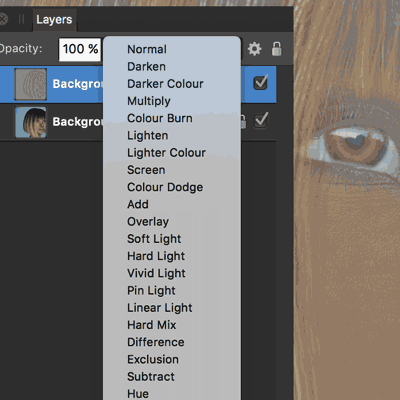
To duplicate, go to the layer menu and duplicate and then use the high pass. Go to the layer menu and change the blending mode as required. In Affinity Photo, the high pass filter does not block you in changing the blending mode so you can alter that as you set the setting for the radius (on my version, the result is not instant but it certainly better than changing the blend and back to the filter etc).
You can then use the high pass filter for some interesting glow effects say in color burn blending mode
More filters and combine them with the high pass filter to create even more amazing effects in Affinity Photo
As with all other filters, you can combine the high pass filter with the high pass filter as well as combine it with other filters such as deform, I really don't see them as just single shot tools. You can now also record all the settings into a macro and store the high pass macro away for future use.
Live filter layer for the high pass filter
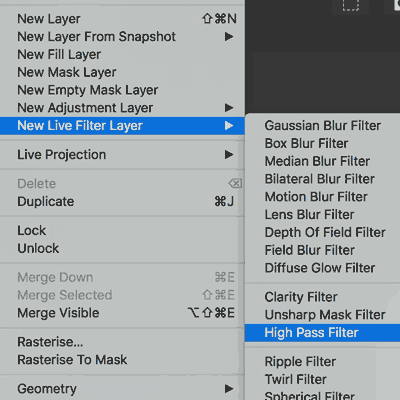
Instead of using a layer and blending modes, you can also use the high pass filter in Affinity Photo as a live filter layer via the layer menu and the layer has the blending mode and opacity built in and it is live so the result can be changed at any point as well as deleted.
In some tasks, the live filter proves a very useful alternative and especially combined with adjustment layers as it does mean instead of creating a gray look (which, of course, is not the real intention of the filter unless you want it to be) you can have a blue and red image but if the high pass filter is purely a tool to generate a layer to blend and mix with the original, that is not such an issue anyway.
You can also add into the mix any of the other (albeit) small number of sharpen filters as well as blurs etc all as live filters which can be changed and tweaked depending on the project.
-
If you wish to apply it to all layers, de-select all the layers
-
If you wish to apply it to a particular layer, select that layer
-
Layer menu
-
New live filter layer
-
High pass filter
-
Set radius
-
Set monochrome or not
-
Set blending mode
-
Set opacity
-
Close or just ignore
High Pass filter
It can be used for some very subtle edge shapening changes and final touches for an image. It can also be used for a whole lot more such glows, ghostly effects and more