Affinity Photo Live Filter Layers Tutorial
graphicxtras > Affinity Photo tutorials > Affinity Photo Filters tutorials
** Youtube video tutorial on how to use live filter layers, how to move them around, how to edit the effecys in Affinity Photo and more **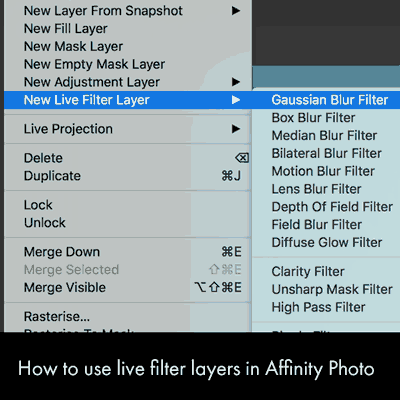
How to use the affinity photo live filter layers feature to duplicate and delete layer effects. Live filter layers in Affinity Photo are a powerful tool to apply effects that can be changed and deleted at any point.
-
Layer menu in Affinity Photo
-
New Live filter Layer
-
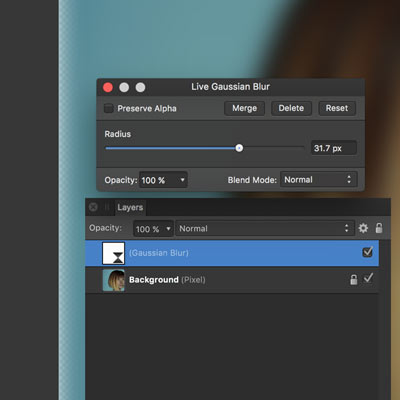
Gaussian Blur filter in Affinity Photo
-
Manipulate settings for live filter layer
-
Go to layers panel
-
Move live filter layer to normal layer etc
The live filter layers can be applied multiple times with multiple effects and settings to create amazing artworks in Affinity Photo. You can access all the live filter layers via the layers panel. You can move the Affinity Photo live filter layers up and down through the layers.
You can use blending modes with the live filter layers actually in the filter panel itself along with changing the live filter layer opacity. You can add live filter layers to a layer so the effect is applied solely to that layer. You can apply a live filter layer to the top most layer. Live filter layers in Affinity Photo include gaussian blur, high pass, field blur and many others but not all filters are live.
The live filter layer is a super flexible feature of Affinity Photo and is a totally non destructive tool. This tutorial shows you how to create a live filter layer in Affinity Photo. This tutorial shows you how to change the settings and how to move the order and position of the effects.
Layers panel and Affinity Photo - the panel is central to the live filter system
A super useful graphics application from Serif, Affinity Photo includes many wonderful tools such as live filter layers (a sort of equivalent to the smart objects and smart filters in Photoshop) and these live filter layers are standard layers (though filled only with the filter effect) and they can be treated as a layer and moved around and positioned beneath or above other live filter layers as well as other layers such as pixel layers as well as vector layers and more
The key panel to use is the layers panel which can be found via the studio in the view menu
Affinity Photo / Live filter layers can be used via the layers menu in Affinity Photo
You can find the live filter layers via the layers menu.
-
Go to the layers menu
-
new live filter layer
-
select a live filter such as gaussian blur
Not all the filters are live (sadly) but the best thing is that the live filters are non destructive and can be changed at any point by double clicking the live filter icon and then going to the live filter settings such as the blur for the gaussian blur.
You can add multiple live filter layers to a pixel layer etc as well as add multiple live filter layers above all the other layers and also you can use blending modes with the live filter layers and the pixel / vector etc layers.
In the image on the right, the gaussian blur is applied to layers below (it is the top layer)
You can also set via the settings / blending mode the blend to lighten or difference to create a difference gaussian blur with the layers below. Using blending modes and opacity is a great way to modify the effects in 1000s of ways with the other effects and layers
You can add one live filter layer or 100s of additional live filter layers and the effect is then applied to all the effects and layers below that.
Filter applied to layer in layers panel in Affinity Photo
You can select the little live filter layer icon and drag the effect below the current layer or move it to other layers.
-
Select a layer in the layers panel
-
Go to the layer menu
-
New live filter layer
-
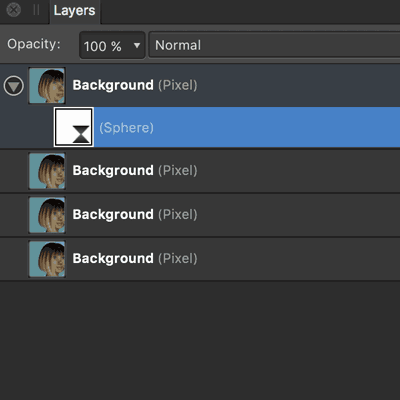
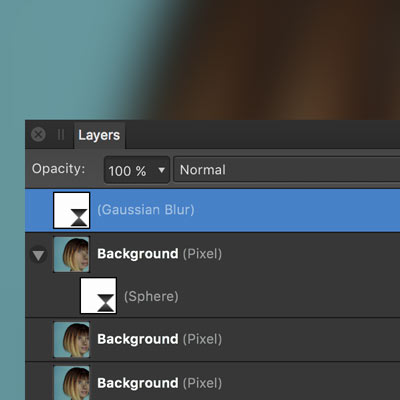
Apply sphere live filter etc
To the right you can see the sphere filter has been added to the background layer. You will be able to see the effect (only applied to that layer though).
If you click on the sphere filter icon (I personally find it more consistent to use the icon than the whole line but that is up to you) and then drag it to another line such as the third layer down - you will not see the effect. You can see the effect only if the layers above have blending modes that the layer and effect to be seen.
Rename live layer effects in Affinity Photo
You can also click on the name such as (sphere) and change it to something like 'sphere filter effect etc'. You do not need to keep it as the default name and may find it easier to mark it as something else (especially if you have multiple effects and multiple layers).
Apply filter as top most layer ... or apply to a layer, it makes a big difference
If you de-select all the layers and then use the layer menu and live filter layer, the live filter layer will be added above all the other layers.
-
De-select the layers
-
Go to the layer menu
-
New live filter layer
-
Guassian Blur (or some other live filter)
If you want the Affinity Photo live filter layer to a layer only then just select that layer and then apply the effect and you will see the effect 'attached' or beneath the layer. You can always select the little icon in the layer menu and drag the effect above the current layer or drag it to the top most part of the layer menu.
Likewise, if you have a top most layer and you want to add it only to that layer (and for the effect to be only seen attached to that layer), just select the little live filter icon and drag down to the layer icon and you will see a little expand triangle appear
You can also add the live filter layer to another live filter layer but that doesn't appear to have any effect at all though visually you can see the expand option for that effect; likewise if you do the same with an adjustment layer as that also have no content.
The key thing to remember is if the live filter layer is added in the wrong place then it can be moved. you can always just select it and drag it to the layer you want
The layers panel and the order and the live filter layers are definitely not cast in stone
Move connected live filter layers up and down a layer in Affinity Photo
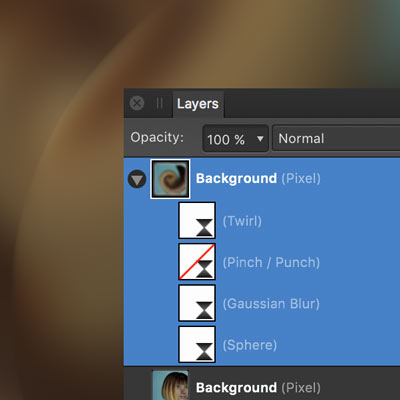
You can add multiple Affinity Photo live filter layer effects to a layer and so you could end up with gaussian blur/ gaussian blur / ripple filter / pinch / noise / twirl etc
You may want to move the twirl live filter to the top position within that layer
-
select the icon for the twirl live layer effect in the layers panel
-
drag above the gaussian blur etc
The order of the effects will modify the observed final effect. The effects below such as the gaussian blur may not be visible unless the twirl live filter layer etc has a blending mode or opacity that allows the effects to be seen.
Move live filter effects from layer to layer
You can also move the effect from one layer to another layer etc
If you have two layers
layer 1 has a twirl live filter effect / blur live filter effect / ripple live filter effect
layer 2 has a gaussian blur live filter effect / sphere live filter effect
and if you want the sphere live effect to be applied to the layer 1
-
simply select that line in the layer 2
-
drag to the layer 1
-
place at the top of that layer
The layer live effects will now have
layer 1 with sphere live filter, twirl live filter, blur, ripple
layer 2 with gaussian blur only
This can be done over and over until you are happy with the effects. The actual displayed result will only be visible if the blending modes and opacity and visibility allow it.
Delete and remove live filter layers in Affinity Photo
They are Affinity Photo layers so you can go to the layer menu and select the duplicate to duplicate the current selected live filter layer effect (to create 10 or so ripple effects if you wish) or just select the effect and then go to the layer menu and select the delete option and the effect will vanish. You can also simply de-select the effect via the layer panel and so you don't need to delete it.
You can also right click to see a context menu such as on the left image for the layer where you can duplicate it in situ and delete and hide etc
You can use Masks with Affinity Photo Live filter layers
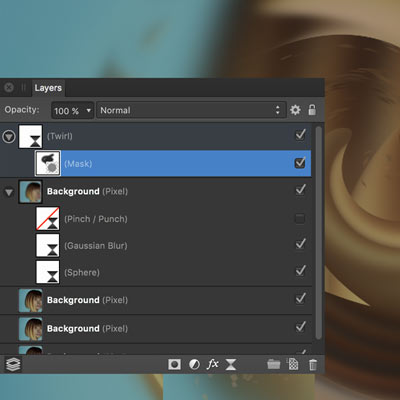
You can also add a mask to the layer, though it should be noted that this does not work with the filter applied to a layer itself but just as a seperate layer
-
Select the layer
-
Click the mask button at the bottom of the layers panel
-
Click on that mask for the layer
-
Select a brush tool and set the color to black etc
-
Paint mask (or paint with white to remove)
You will then see more or less of the effect added to that layer and that can be done for all the live filter layers. You can also apply standard filters to the mask through you can't add a live effect to the mask layer (guess that would be getting a little complex). I would say adding masks etc as well as multiple effects even pushes Affinity Photo a little.
Selections and effects can be used with the live filter layers

Another interesting area to explore is to use a selection and then add a live filter layer as the gaussian blur etc effect is added only to that part of the selected image.
The selection can be a basic selection but it can also be a more complex selection such as a tonal selection via the select menu and it can also use multiple effects such as twirl and blurs etc
You can re-select and again apply another live filter layer effect to the current selected item in the panel