Affinity Photo Radial Blur filter Tutorial
graphicxtras > Affinity Photo tutorials > Affinity Photo Filters tutorials
** Youtube video tutorial on the radial blur filter in Affinity Photo **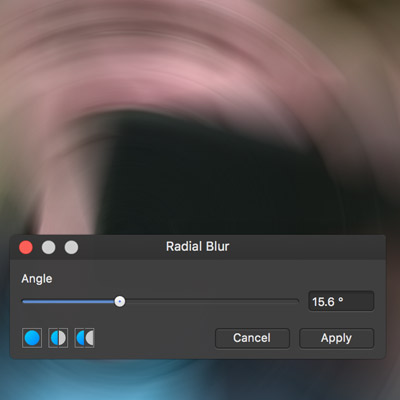
The radial blur filter in Affinity Photo can be found in the blur category of the filter menu in Affinity Photo. The radial blur does not come with a vast number of options (one in fact) but the radial blur can be combined with other effects as well as used multiple times to create interesting effects in Affinity. You can also use the radial blur filter with images etc as well as other resources such as those that can be found on this site
-
Filters menu
-
Blur
-
Radial blur filter
-
Set angle
-
Set focus point / origin
-
Apply
Radial Blur
It can be used on multiple layers. The filter can be used on different channels so you can apply the blurring to the red channel and then change the origin point and the blur setting and you can then apply different settings to the green and blue channels. You can also use the radial blur with different selections so create a quick selection with the freehand selection tool and then apply the filter effect. You can also apply it to the inverted selection as well. You can also use the filter effect with the powerful layer menu fade command where the effect can be reduced / faded with opacity and blending modes. The effect can also be applied to text as well as shapes to create all kinds of amazing effects.
The filter is only available as a filter effect, there is no live filter effect so any changes are destructive so if you want to apply it then perhaps use snapshots or create a duplicated layer to use with the settings.
The video tutorial at the top of the page goes through a number of ways to use the powerful tool and hopefully will explain some possible uses of the radial blur but there are many more.