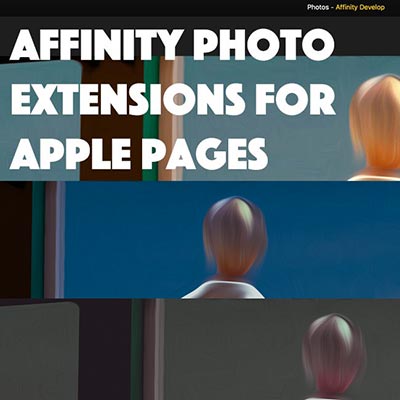
Affinity Photo Extensions into Apple Photo Tutorial
graphicxtras > Affinity Photo tutorials > Affinity Photo How To tutorials
-
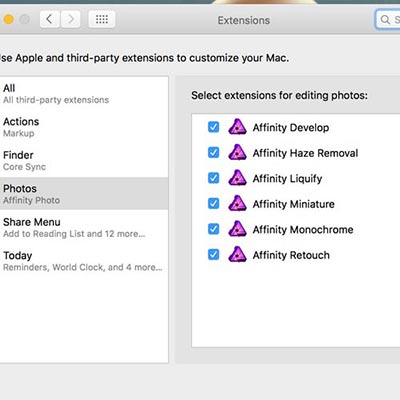
System preferences (dock)
-
Extensions (Apple)
-
Photos in left panel
-
Select extensions for editing photos (right panel)
-
Click the Affinity Photo extensions you want - Affinity develop, Haze removal, liquify, miniature etc
-
Start Apple Photo application
-
Click the edit photos button in top right corner
-
Click extensions at the bottom and display added extensions
-
Select one of the extensions such as liquify etc
How to add Affinity Photo Extensions into the Apple Photo / Photos application on your mac tutorial (and use haze, liquify, miniature etc). How to add Affinity Photo extensions in to Photo application from Apple (or Apple Photo). When you purchase Affinity Photo / Photos, you receive the application as well as as six extensions that can be installed via the system preferences and extensions and photo section.
The six Affinity Photo extensions are develop, haze removal, liquify, miniature, monochrome and retouch. Once you have installed them onto your system, you will be able to see them and use them in Apple Photo (or Photo) via the edit photo option and select extensions. They are powerful graphic tools with many settings such as warping photos inside Apple Photo and blurs and color effects and more.
This tutorial shows you how to add the Affinity Photo extensions to Apple Photo / Photos. How to access the extensions in Apple Photo. The tutorial also shows the basic use of the various Affinity Photo extensions and results. It is super easy to add the tools into Apple Photo and then to use them and the results can be amazing. The develop persona extension is full of super handy color features such as contrast, white balance, noise reduction, saturation, exposure and more. The monochrome extension is also excellent in Apple Photo.
Extensions for Apple Photo or Photo as it is now called
Extensions have now been added to the Apple Photo application with the release of El Capitan. At present (Jan 2016, there doesn't appear to be a huge number of tools available but I guess they will start to appear over time. Affinity Photo have jumped in with their own set of 6 useful tools that sort of match (to a lesser extant) the tools in the application such as develop and Liquify. So how to get them to appear in the first place ???
You can find more about Affinity Photo via their site (the company is Serif). They have another program available called Affinity Designer and it is a pretty decent application as well (and there are rumors of another in the works which I really hope is an Affinity Video app or Affinity 3D app.
The extensions are added during the install of Affinity but you can select them via preferences
Well, they are added by the app in the first place and if you have no extensions then either the app doesn't add them or something has failed in the extension install process and in the case of Affinity Photo, I would contacting them with the details as they should be available if you are using 1.4+.
OK, first thing to do is to go to the Apple Photo or to the system preferences, either is fine.
In system preferences
-
Go to the extensions
-
You will see an entry for photos
-
Click on that on the left side panel
-
You will see 6 (or more if you have other extensions installed)
-
You can select them or not depending on if you wish to add them to the Apple Photo app.
You can also do the same in the Apple Photo app via the extensions button at the bottom of the edit panel
To quickly access the tools in Apple Photo via the edit button
-
Start up Apple Photo (or as Photos as it is now called)
-
click on a picture though before you do anything
-
I would suggest that you duplicate the photo and at least you can always go back to the source image.
-
Far right at the top there is a little edit button (could they have made it any more obscure ?? why isn't the edit in the edit menu ?? ) Click on that
-
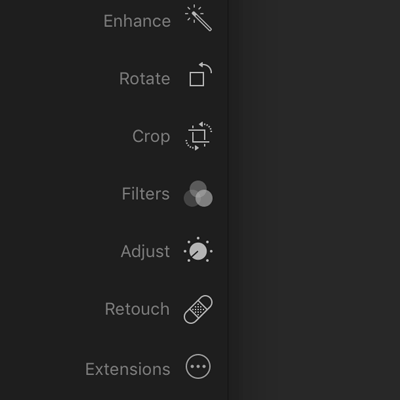
Once you are in edit mode, you will see the picture and the tools / extensions / filters etc down the right side (enhance, rotate, crop, filters, adjust, retouch, red-eye, extensions).
-
Click the extensions (...) and if the installed items are there (excellent) if not then go for the more and then add them via the preferences.
-
Now you should have all the extensions to play with in the application.
Many different features are included in the tools such as haze, liquify, miniature, twirl etc
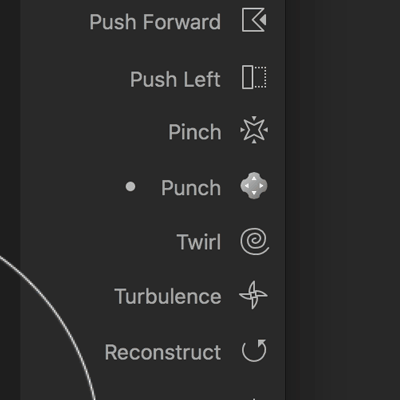
There are a number (six) such as develop, haze, liquify, miniature, etc. They work in much the same way as the tools with Affinity Photo so if you want to tweak the exposure etc then you can use the develop tool and if you want to warp the image in 1000s of ways, you can use the liquify.
I would love to see the "Affinity Photo Mirror Extension".
Once you have finished your edits, click the cancel or save changes
An error message appears with my extensions in some cases (perhaps that is just my setup). You can then revert to original or you click done.