Photoshop Texturizer Filter Tutorial
graphicxtras > Adobe Photoshop tutorials > Photoshop filters tutorials
Photoshop texturizer filter tutorial, how to create amazing textures on your images and layers and in channels etc using PSD displacement files.
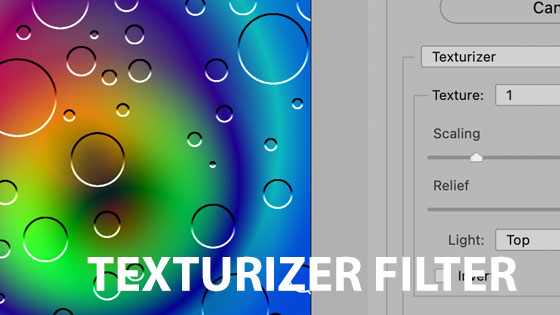
1. Where is the texturizer filter in Photoshop
The texturizer filter is a powerful filter included in the Photoshop filter gallery and can be used to create amazing texture effects with any image or text etc. Select image to use with the texturizer and displacements in Photoshop and go to filter menu and filter gallery and Texturizer and set scaling etc and set PSD file to use in texturizer filter and click OK
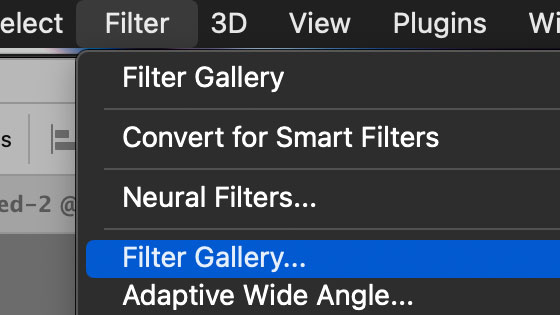
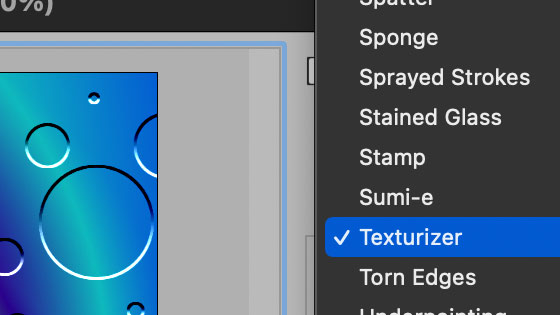
and select via the gallery or via the long list of filters included in the gallery
2. Format for displacement maps / textures
The files for the texturizer filter are all in PSD format (though it does come with a selection of 4 inbuilt textures but I don't think I have ever used those in my life ! You can find many displacement maps on the web as well as create your own
3. Texturizer Filter / displacements in Photoshop
Once you are running the texturizer filter, by default there are a few textures already included such as sandstone etc but you can go to the little texture side menu and use the load texture and browse for a PSD file, select a file.
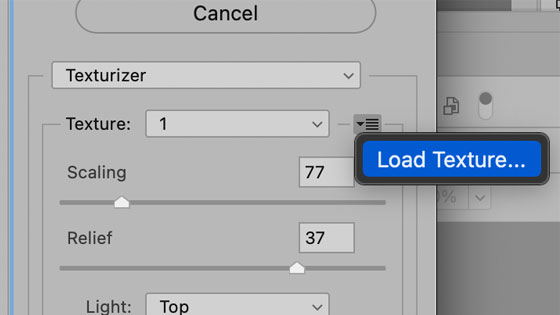
Change the scaling setting, sadly the range is only 50% to 200% of the original size of the texture (really not sure why they couldn't extend this range) and set the relief. If you set the relief a low value the texture will be very subtle, set it to a high value and you will see the white edging as applied via light (top, etc but sadly not an angle) as well as option to invert. It is a pity that this filter does not use the foreground color to re-color the edge of the texturizer relief.
4. Combine with other filters
You can use the texturizer filter in combination with other filters such as using the gaussian blur or maximum filter in between applies of the texturizer. The combination of filters and re-applies of the texturizer can also be captured in an action via the window menu and actions panel and recording the steps.
5. Texturizer filter and smart objects
You can use the texturizer filter as a smart filter by converting a layer into a smart object and then adding texturizer filter effects as smart filters (as well as combined with other smart filters and adjustments). The beauty of the smart filter is that the filter can be quickly deleted as well as the settings changed so the relief can be altered or the scaling changed or the texture changed.
Select layer in layers panel, go to the layer menu in Photoshop and Smart objects and convert to smart object. Go to the filter gallery and texturizer and apply the effect. Repeat the effect but with a different texture
You can then see the result of the texturizer filter as well as the entry in the Photoshop layers panel. The effect can then be edited or deleted in seconds.
6. Color channels and Texturizer filter
You can use the filter with color channels and separate color channels
Display channels panel (window menu) in Photoshop and select the red channel. Apply the Photoshop texturizer filter - perhaps select a different displacement map and scaling. Select the green channel. Apply texturizer etc with different settings and so on. This can be done with any number of combinations of the color channels.
7. Selections and Texturizer filter
You can also use the texturizer filter with selections and you can create a selection using the rectangular marquee or anything from the selection menu etc and once you have the selection, apply the texturizer filter to that selection or perhaps the inverse of the selection
8. Texturizer filter applied to Shapes
You can also use the texturizer filter in Photoshop with shapes, just select any shape design from your custom shapes panel and apply that and set the color etc and then go to the filters menu and the filter gallery and apply the texture to that shape and as you do that, a panel will pop up and convert it to a smart object or if you wish, rasterize it. You can then add multiple texturizer filter effects to that shape. You can also do the same with type
9. Texturizer and Pattern Preview
You can also use the texturizer filter in the pattern preview though it is not much use for seamless textures (be great if the pattern preview allowed for seamless tiles and mirror option) and it will warn you as such but the texturizer can be applied and the layers etc generated with the texture effects can be added and combined in endless ways, see the video at the top of the page.
10. Combine with other filters within Filter Gallery
You can use the filter gallery solely for the texturizer but by going down to the small duplication button '+' at the bottom of the filter gallery panel you can also add multiple other filter gallery effects such as bas relief or emboss etc. You can also add two or more texturizer filters and you can combine them in all number of ways as well as different settings. The filter gallery combination of filters are live and you can change the scale / relief etc along with the glass, bas relief etc effects. Sadly, the tool does not include presets as it would be wonderful if you could quickly store the settings for future use. One workaround around this is to use actions which can be replayed.
11. Alpha channels and texturizer filter
You can use the texturizer filter also with an alpha channel. Go to the window menu and channels and then go to the channels panel. Select the entire image via the select and select all and then edit menu and copy. Go to the right side menu of the channels panel and select new channel and create selected area and with the alpha channel selected, edit menu and paste. Go to the filter menu and texturizer filter via the filter gallery and select the texture you want to use and click OK.
Go to the select menu and load selection and use the alpha channel and press OK. You now have a selection on the image. You can use the edit menu and copy and edit menu and paste so the textured image is now a layer (it would be great if all the filters generated a new layer as with the neural filter and colorize filter) As a layer, you can add layer effects to it via the layer menu and layer style and bevel / drop shadow etc and you can vary the bevels, etc