Photoshop Path operations / Unite / Combine / Subtract / Intersect tutorial
graphicxtras > Adobe Photoshop tutorials > Photoshop how to tutorials
** Youtube video tutorial on how to combine, unite, subtract, intersect etc paths and shapes in Photoshop **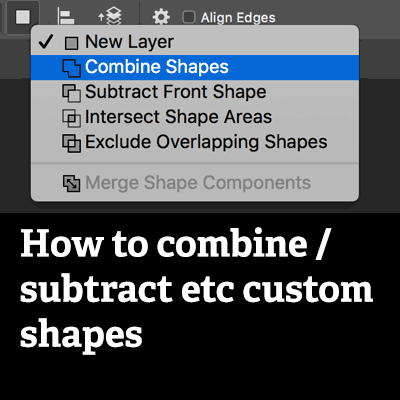
How to combine / unite Photoshop custom shapes layers using combine, subtract etc path operations tutorial.
You can combine paths / shape layers in two different ways. You can use the tools along the top bar such new layers, combine shapes etc to use as you add shapes. You can also use the layer menu and combine shapes commands to combine the selected shapes (in the shapes layer). You can combine custom shapes. You can also subtract font shape.
You can also intersect the shape areas of the selected shapes. You can also generate the exclude overlapping shapes. At the end of the combine, subtract etc you can then merge the shape components using the top bar command. You can use the path operations such as subtract to creating interesting frame designs, mottled effects, scratchy path effects. You can also simply combine two or more shapes together. This tutorial shows a number of ways to unite and subtract and intersect shape layers in Photoshop
-
Create a shape using the shape layer option
-
Go to the top bar and set the option to combine shapes
-
Add another shape (added to the existing layer instead of creating a new layer)
-
Go back to the top bar and set back to new layer
-
Create a new shape (and you will notice it is created as a new layer)
-
Select both of the shape layers in the shape panel
-
Go to the layer menu in Photoshop
-
Combine shapes
-
Unite shapes
Basics of combining paths using path operations / top bar of Photoshop
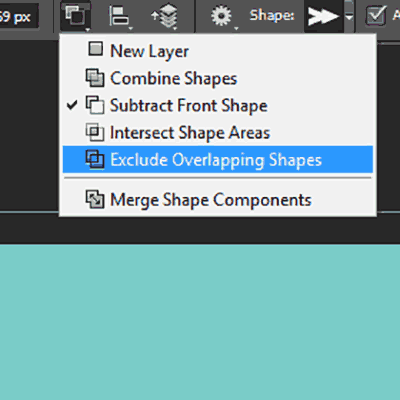
The key thing is that the artwork is a layer. This feature is for use for ongoing additions of paths and not for selecting and combining existing paths. Using the combine option for the live shape / custom shape layer (top bar of Photoshop)
-
Combine
-
Subtract front shape etc
-
Intersect shape areas
-
Exclude overlapping shapes
-
Merge shape components
Multiple combinations can be made. Areas can also be subtracted / excluded / intersected (or subtract overlap etc - should be noted that the terminology has changed a few times and hopefully it won't change any time soon) to create a new shape. A single pack of shapes can be used to create millions of different and exciting designs.
Layer menu and combine shapes
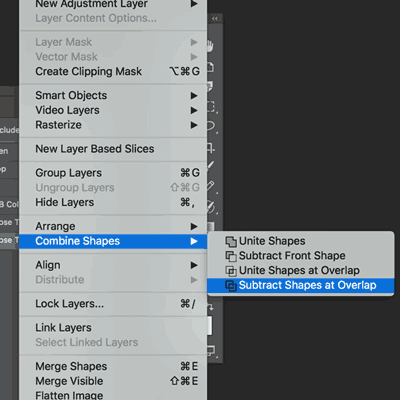
Layer menu and combine shapes to combine two or more existing layers
-
unite shapes
-
subtract front shape
-
unite shapes at overlap
-
subtract shapes at overlap
If you are using the CC subscription then it may be easier to do all these path operations via Illustrator as you can then use the pathfinder panel to create ever more complex vector paths and also you can use many additional path tools such as Astute graphics' VectorScribe plugin and MirrorMe which are sadly not available to Adobe ® Photoshop ®
Path operations in Adobe ® Photoshop ® order
The key thing to remember with the path operations is that the path operation works on the active shape so if there are no other shapes, the subtract option will just subtract from the entire document.
If you add multiple shapes and use the combine option and then create a new shape layer and wish that to subtract, draw the shape and then apply the dropdown to subtract front shape.
I must admit, I find it easier to use combinations of shapes and then use the merge command and then continue on with additional combination or path operations and then another merge. The results are often more predictable.
I would say that sometimes the path operations just do not seem to work and then suddenly they will, it does seem to have something to do with the properties panel which also contains yet another way of combining shape layers in Photoshop (three ways, I am certain there are a few more ways)
Combine Photoshop pixels - you can just use the background color to subtract from the original shape
The option to add new Photoshop shapes / subtract only appears when you are applying the designs as shape layers and paths but not fills. You can always add shapes via the fills by applying the design in the same color; you can also subtract from the shape by applying the designs in white, 'erasing' the shape - the intersect are not possible.
Distress / mottled shapes using subtract path operation - use circles and subtract shapes to create a mottled effect
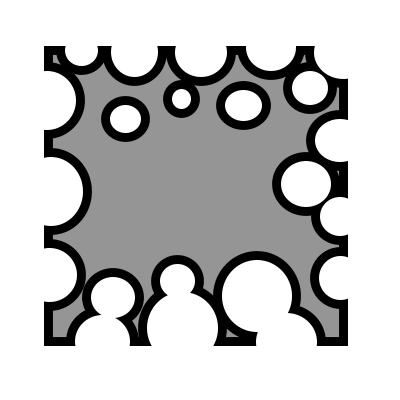
Use the path operations / subtract features to create distressed shapes in seconds.
Personally, I generally use a vector application such as the fontlab tool or Adobe's own vector application to subtract and add shapes to a custom shape but if you are using Photoshop, these tools are still very powerful. Right image - you can see a mottled artwork with very small circles combined with a rectangle and the circles have been subtracted from the original rectangle all around the edge of the work as well as a small selection inside the rectangle.
You can, of course, use any number of other vector layers with this combination and not just circles either so you could instead use rabbits or hens or screwdrivers or any other vector artwork in the the subtraction (circles just happen to be a little easier to use than those)
-
Select the rectangle tool
-
Set to shape layer option
-
Draw rectangle shape
-
De-select shape
-
Go to the top bar and set to subtract front shape option
-
Re-select the rectangle
-
Select the ellipse tool
-
Draw circles into the rectangle shape
-
All the way around to create a mottled look
Scratchy line effect - you can use the rectangle tool and subtract front shape to create a scratchy / sketched effect in seconds
In the example right a line tool (found in the toolbar) was used instead of circles (as above for the mottled look). The lines have been used to scratch into the artwork. Different widths of line were used across the artwork
-
Select rectangle tool for frame
-
Set to shape layer
-
Draw rectangle across image
-
Deselect the rectangle
-
Go to the top bar, set subtract front shape
-
Re-select the rectangle frame
-
Select the line tool
-
Set the width for the line tool
-
Apply around the edge multiple times
-
Change width etc
Combine 'unite shapes' layers in Photoshop
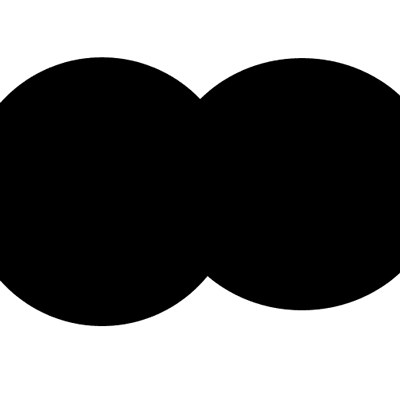
It should be noted that sometimes it is referred to as combine and sometimes as unite depending on how you perform the operation.
If done via the layer menu commands then it is unite and if used via the top bar of Photoshop it is combine (totally confusing but that is the way it currently stands though these functions has had a few changes over the years but the basics are still much the same - you want to stick two objects together !
The image on the right has had two circle / custom shape layers combined or united
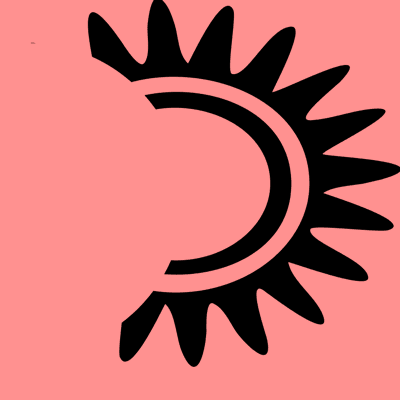
'Subtract front' shapes combine / path operation in Adobe ® Photoshop ®
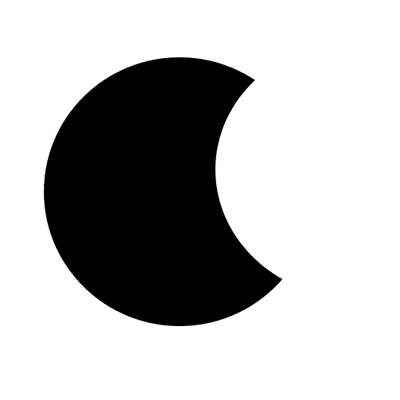
The path operations such as subtract front can be done with any other artwork, of course, and is not limited to just circles. The subtract option can be repeated with the same artworks over and over to remove more and more from the original source artwork shape layer in Photoshop. On the right, you can see a shape layer with a shape layer subtracted (a circle) from a circle to create a crescent custom shape
To use the subtract front shape option in the path operations along the top bar of Photoshop
-
Create the first shape and de-select
-
go to the path operations
-
select the subtract front shape
-
apply new shape
If you want to subtract with the layer menu option
-
select shape 1 and 2
-
go to the layer menu
-
combine
-
subtract front shape
'Unite shapes at overlay' combine layers / path operation
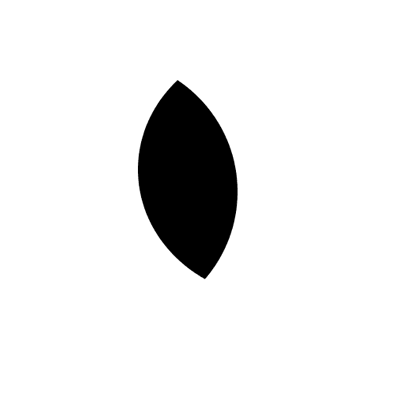
The right image is the intersect of two circles in Photoshop. You don't have to use just circles, of course, as it could be any custom shapes or rectangles etc.
Combinations / subtracts / intersections can be repeated over and over to create all kinds of new works and once you have finished, the work can then be defined as a new vector artwork and stored in the preset panel of PS as well as being added to the CC libraries and stored for future projects.
If using the top bar Photoshop path operation option
-
Create a new shape
-
Deselect shape
-
Go to the path operations
-
Select the intersect shape area
-
Apply new shape
If using the layer menu
-
create shape 1 and 2
-
select them
-
go to the layer menu
-
combine
-
unite shapes at overlap
'Subtract shapes at overlap' combine / path operation
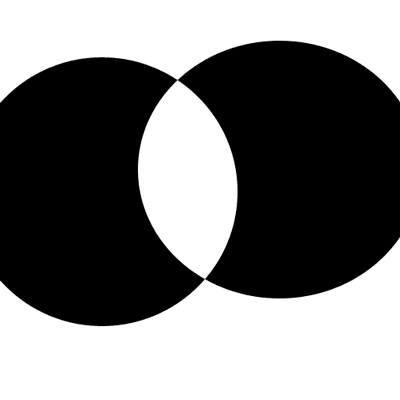
The right is the 'exclude' or subtract shapes path operation applied in Adobe ® Photoshop ® for the two circle layers. Of course, as with all these path operations, you can use shape layers other than just circles and you can create all kinds of wonderful excluded designs
The vector artworks can also be selected and then defined as a new custom shape via the edit menu and define custom shape command.
If using the path operations along the top bar
-
create new shape
-
deselect the shape
-
path operations
-
exclude overlapping shapes
-
apply second shape
If using layer menu
-
create shape 1 and 2 and select
-
layer menu and combine
-
subtract shapes from overlap
Merge combine shape components - a good way to finalize the combination of the custom shape layers
There is also, at the end of the path operations, a merge operation which turns the current combination into a regular shape (apart from a live one).
Personally, I find that I like to use the merge command more often than not as sometimes the result of a subtract or unite etc results in a very odd combination and that can generally be resolved by using the merge.
The Merge option for the Photoshop combine layer shapes can be found by selecting the artwork and then going to the top option bar of Photoshop and going to the path operations dropdown (combine, subtract etc).
If it is not available then you will need to use the direct selection tools and then the merge should be available as well as the custom shape tool define operation.